Quantcast
Channel: NerfHaven - Homemades
Viewing all 167 articles
Browse latest View live

Stacy: Mag Fed Pistol F.A.R. - First Homemade, Advice Appreciated

$
0
0

Hello,


This will be my first post on Nerf Haven, though I have been wandering around on here for the last couple weeks, so please be gentle with me.


I have been trying to design a nerf blaster with the following requirements in mind:


Compatible with standard purchased Nerf Magazine/darts

Easy to build ie, dremel and hand tools only

Low Cost

Mechanism easily modded between pistol/rifle/shotgun


With these thoughts in mind, I did my research and managed to come up with the following:


stacy_operation_by_the_tulip_mama-dakz51


stacy_exploded_by_the_tulip_mama-dakz519


The bolt (highlighted in green) is pulled back by a pair of screws that are slotted in the 1 1/4" pvc body. I'm using an F.A.R. trigger system that catches on a 1/2" washer built into the end of the plunger.


The bolt has to be pushed forward to seat the nerf dart in the barrel, and right now this end of the bolt is a simple tube (up-cycling the body of a bic pen) but I think I'll try and find a way to put in a hollowed out 5/8" dowel to push the dart and make a seal on the barrel.


When the trigger is pulled, the plunger is sent forward and the air is forced through the tube and up the back end of the dart. The next dart moves up into the chamber when the bolt is pulled back again.


I'm hoping to get some advice from people more experienced in making nerf blasters. The first design I tried to make failed horribly in part because I attempted to make something I didn't have the tools for, and partially because of assumptions I made in my design. With this, I'm hoping some noble members will be able to point out some design changes that can help that I haven't seen.


Thank you in advance,


Sincerely;


Tulip Mama


Nerf Gun Gambol shroud!

$
0
0
Well guys, I'm back! My ember Celica Nerf guns were well received at Anime expo and I made Gambol Shroud to go along with them!

I made a short video about it and gave some information on how I made the weapon.

It was a good amount of foam, pvc board, glue and a Nerf NStrike Reflex IX 1

I hope you all enjoy it!

My best,

Pk0h

Arquebus Rainbow Catch.

$
0
0

As a thank you for the inspiration of the Rainbow catch, I'd like to share the design for the modified version of the Rainbow catch that I used in my LARP ready Arquebus.

The first picture is of the 3D printed components (SLS printed in nylon) components and the two catches (one for the piston, the other smaller one is a safety catch for the ramrod) which are laser cut.
The catch body is on the far left. (and yes that is an SLS printed piston!)

The next picture is a rendering of the catch body itself. The actual catch slides inside the catch body. The catch spring, rather than being on the pin, is hidden inside a hole drilled inside the catch itself. This allows the spring to be contained inside the pseudo barrel of the arquebus, and allows for a slightly smoother operation and less chance of trying to work its way into the barrel through the hole drilled for the pin.
Although its not visible in the photo, the catch itself is machined to have a countersunk chamfer on it. 

The little indentation at the bottom of the catch body, is for a metal lug to be screwed into it, this allows the barrel to be fixed into the stock, and is not that different to the same feature seen on barrel breech plugs seen on actual black powder guns.

Edit:

I've added a drawing of how the catch now looks.
The square recess takes the spring (5mm dia spring), while the T section is a nut capture for an M3 Nut, which saves having to drill and tap the catch.

I've also uploaded an STL of this catch, in case anyone want to have a play with it.

Attached Thumbnails

  • 14715048_10154404214730041_7507165298988620252_o.jpg
  • catchB.JPG
  • catchB2.JPG

Attached Files

Single part trigger homemade design

$
0
0

IMG_00021.JPG

This is my first homemade, After looking at a bunch of others posted here I came up with my own design (I think). It's quite reliable and very simple/easy to make. I haven't got ranges for it yet but i would say it is pretty average in that aspect.


IMG_07002.JPG


This video should explain how it works.

Attached File  JTCR09331.mov   5.29MB   54 downloads

Staining PVC Parts

$
0
0

This is an alternative process to that of Vinyl Dye. Vinyl Dye still produces very nice results, however it can be somewhat expensive to buy and comes in a very limited palette of colors. This process however comes in a nearly UNLIMITED variety of colors (darker shades may be difficult however) for very little investment. For $40 you can mix up to 6 colors and still have dye leftover to make another batch. The color mixtures last for up to 3 months when kept in jars and can stain several dozen parts.

sb2s.jpgrs_14.jpg

Most of the Purple on the Caliburn prototype is an absurdly expensive spray vinyl dye I found called "Meltonian Nu-Life" that's originally intended for doing touch-up repairs on shoes. It comes in all the colors that shoes typically come in, including purple, raspberry, pink, and a bunch of other ones.

Pink: https://www.amazon.com/Meltonian-Nu-Life-Color-Sprays-Pink/dp/B002TEJMZE
Purple: https://www.amazon.com/Meltonian-Nu-Life-Color-Sprays-Purple/dp/B002TEFNYI/
Raspberry: https://www.amazon.com/Meltonian-Nu-Life-Color-Sprays-Raspberry/dp/B002TEJN4Y


The plunger part however was experimentally stained using an expired can of Purple Primer. The color turned out very very dark and very interesting so I wanted to find a way to make my own primer in other colors and found a tutorial on how to do so. But that tutorial was extremely short and did not provide much in the way of detail.

For dying PVC you need a fair amount of supplies. I need to take some photos of the table I'm using for this, but it's not very complicated to explain.
dye_00.jpg

First, you need Oatey's Clear Cleaner.
51cUin7A%2BuL.jpg
http://www.lowes.com/pd/Oatey-32-fl-oz-Cleaner/4750193

Only buy the large container. The smaller sizes are only slightly cheaper and won't really be enough if you want to mix more than one color.

Second, you need to have multiple 1-quart Ball jars. You can buy a case of 12 from Wal-mart or a grocery store for $11.

41vuCMu5NNL.jpg

You won't be able to use the lids that come with them, but you will need the rings. The vapor from the clear cleaner will start dissolving the gaskets on the lids that come with these after only a day. So I've started just using aluminum foil and the canning rings to cover these containers.

Third, you need to buy petroleum(oil)-based dyes. Water-based dyes WILL NO WORK. I bought this primary color set from Amazon. But you can also use "fuel dye" which comes in other colors as well as a nasty UV green which could look pretty neat. Any oil-based dye set will work and they're available from a variety of suppliers.

https://www.amazon.com/Firefly-Colored-Lamp-Oil-Dye/dp/B00NJ69X4Q/


OTHER SUPPLIES you are going to need

  • kitchen gloves
  • Aluminum Foil (to use with the canning rings, and to set down the parts while they dry)
  • a few lengths of PVC to use as stirring sticks and color testing pieces,
  • paper towels for rubbing the stain onto your parts,
  • Somewhere outside where if you spill any of this stuff you're not going to ruin anything.

Follow the instructions on the clear cleaner container. I've found that the stain cures insanely fast, and even more so in colder weather.

1. You split the clear cleaner into multiple Ball jars. You only need a little bit in each one. Have some left over for prepping the parts you intend to stain so that you can clean the lettering off of them prior to stain. Alternatively you can sand the lettering off instead.
2. PUT ON THE GLOVES. Getting the clear cleaner on your hands after adding the fuel dye will make your hands look like they have some terrible disease like jaundice or something. I would also advise having extra latex gloves available. Vinyl gloves WILL NOT WORK. I bought some and the clear cleaner will eat holes in them in under 5 minutes.
3. The amount of lamp oil dye you need to add to the cleaner seems to be variable between colors. Red or blue take mere drops to work. Yellow however is somewhat weak and you may need to to do a squirt or two from the bottle to get enough color. MORE DYE does not always mean MORE COLOR. Often times you just need to apply multiple coats instead of adding more and more dye.
4. Use paper towels on a test piece to confirm that the mixture is producing the color you want. The solution will appear WAY darker than it will when you get the paper towel wet with it, and infinitely darker than the stain will look once it goes on the PVC.
5. If the color rubs on too light or not the right hue, adjust the dye balance as needed. This takes multiple tries.

6. Use paper towels and dip them into the clear cleaner that hasn't had dye added to it.
7. Wipe the clear cleaner on your actual parts to take the lettering off and prep them
8. Wait 5 minutes.
10. Use paper towels and dip them into the dyed clear cleaner.
11. Use the dipped paper towel to wipe stain onto your actual parts.
12. Set the parts aside on a sheet of aluminum foil or hang them from hooks. If doing so in colder temperatures or high humidity the evaoprating cleaner will tend to cause the stained parts to draw moisture.
13. Wait 5 minutes
14. Apply extra layers of stain to add more color as needed


If you want an even coat of a single color avoid using more than one dye mixture at a time. Applying one mixture to another that was previously applied can produce unpredictable results. You can however get really interesting fade effects from one area of a part to another and get tie-dye effects inbetween. For example applying an "Orange" mixture to a part stained with a pure Blue dye mixture can cause the Yellow dye component from the "Orange" mix to leach out into the Blue dye creating Green areas. So be aware that every application results in a remixture of the dye components on the surface of your part. Blending colors in the mixture itself is much more predictable than trying to do so on the part itself.

This process seems lengthy, but once you have jars of color mixes you like, the results are extremely repeatable and it takes no time at all.
I've tried this process on things other than PVC and the results are nowhere near as good.


White Polycarbonate ends up looking kind of weird, though this may be because it's translucent white instead of an opaque white. I also worry that the cleaner is going to harm the structural properties of those parts, so I do not advise using it on that material if you can avoid it. I'm going to stick with using vinyl dye or Krylon fusion on polycarbonate.


Acrylics should be quite compatible with this process, but I don't have any on hand to try.

It should however work really well on all the plastic types listed on the container of cleaner. But keep in mind that the stain is VERY transparent when applied so it cannot be used to recolor blasters that already contain pigment. It's only useful for turning WHITE plumbing parts into other colors. You can also use it to tint clear PVC tubing to different colors.


Initially I was dipping my parts into the stain to color them, but it turns out that when you first add the dye doing the process this way will wash prior layers dye off and the dye won't seep into the parts as readily so you end up with a very light application of color. In order for the stain to really take hold you have to wipe it onto the parts using paper towels since doing that allows the cleaner to evaporate and leave the dye behind in the plastic.


This changes over time as the cleaner mix evaporates. The longer the solution sits, the higher the proportion of lamp oil dye gets so your color mixtures WILL darken over time AND you will be able to switch to staining parts by submersion after the mixtures have sat for a week or more.


FINAL NOTE: Clear PVC Cleaner is nowhere near as chemically strong as Purple Primer. Be aware that using either product on PVC parts will cause those parts to swell dimensionally. This is especially true with Purple Primer which can cause stronger dimensional changes. So parts that need to fit precisely probably should not be stained using this process (or only done sparingly or selectively) if you do not have the ability to post-machine your parts to correct for this. The breeches I stained with purple primer had to be touched up by -.002" on diameter afterwards.

Homemade Crossbow Blaster

$
0
0

Okay so this project is a little weird... A while back I was given a piece of wood that looked like a rifle, so I turned it into a rubberband gun. But that wasn't powerful enough for me... So I turned it into a friggin crossbow... or slingbow... since it's technically powered by rubber... And now I've decided I want to make it shoot nerf darts. I've never made a homemade blaster from scratch, so I've got a couple questions that are out of my area of expertise.


Here are some pictures:


e3fe455b19e78bb009f507bf4db5cd18.png


4d243990ed8f23fb86909391c0142295.png


4974004b75794c099184384fb55d88b8.jpg


My plan is to mount a plunger tube where the barrel currently is. I'm thinking I'll either salvage the plunger tube from an old longshot I have, an old ball pump I have... Or I'll make one myself. Which is why I'm here.


What would you, the community, suggest I use for my plunger tube, and what would be the best plunger head I could use? If any previous homemade build threads come to mind when reading this thread, please link them to me. I'll be looking through them myself as well. 


Personally I'm thinking using pvc/cpvc for the build, because in my head it seems like it would make things easier during assembly. But once again, I'm not experienced in this field so I wouldn't know. All I know is that I'm gonna try my best to overkill this build as much as physically possible.


And for a side note: If you guys have any tips for me for this build, I'd love to hear them.


Thanks!

4xdblack

What type of o-ring/other seals are good for 1 inch pvc?

$
0
0

Yeah, so i'm making a really odd bow type thing, and i'm wondering what has a good seal on 1-inch PVC

Note: I will try and post the final product, but I have a horrible camera


-Montymarks

Questions about The Mad Ghost by, 3DBBQ

$
0
0

So I am considering making The Mad Ghost by 3DBBQ but before i go off making my first ever homemade i have a few questions.

(Please bear in mind that i am basically a homemade noob.)


1. what keeps the darts from falling straight out the barrel?


2. In The writeup here on nerfhaven they make it to shoot megas if I'm not mistaken, is there anyway you could make it shoot elites? i would assume you would just change the barrel sizes but i don't really know.


3. i'm assuming that the PVC sizes are standard USA sizes. is that correct?


4. where can i find the correct valves/tubing for the trigger?


All help is appreciated. and i'm sorry if any of these questions are completely stupid. Thanks! ENP10-


SNAP Question

$
0
0

For the catch of a SNAP, how far does the nail need to travel? Also, do I need to have it mounted on a clothespin, or can I attach it to something else? (Like the catch of a Sharp Shot)


I'm asking these so I am able to start Project #3 (a SNAP) as soon as I finish Project #2 (My Xbow). 

3D Print Question

$
0
0
I'm trying to come up with a printable Rainbow Catch for 1-1/8" ID polycarbonate tubing, but I need to know something fairly specific. How thick should the actual catch face be? It would be printed at 100% infill, unless there's a stronger pattern than solid plastic. I'd like it to be able to handle 55+ lbs of draw in case one of you is loco enough to use this with a full compression K14.
 
The face will be 3/8" by 3/16", and I'd print it such that the plunger rod would be perpendicular to the planes of the layers.
 
I don't know much about printing, and I haven't yet taken Properties of Materials, so I'm asking people who might know.

A hardly ideal +bow

$
0
0

I've wanted to make a +bow for years- about since it first came out- but I could never quite get it to work. The materials and tools required were prohibitively expensive, and my brother and I had already collected a whole galaxy of comparable modified blasters in the meantime. After a string of other failures and disappointments, the whole idea of homemades kind of dropped off my radar.


Fast forward to 2016. At work, I've been tasked with feeding and watering our new-ish 3D printer, which we got it for making prototypes, quick repair parts, and custom tool caddies. My boss told me to "get good with the thing" and "I expect to see cool things on your desk soon."


He's a great guy, but you should really be careful what you wish for.


F7SX5T9IXUQAFY3.LARGE.jpg


Not the greatest +bow in the world, but it's mine. And aside from a janky Snapbow-like thing that scored maybe one hit before ruining itself, I'd call this my first practical homemade.

  • Aside from the plunger body, spring, and fasteners, everything is 3D-printed.
  • Largely identical to CaptainSlug's original except for some minor tweaks.
  • Embellished the panels and grip with triangular cutouts. I kind of have a thing for triangles these days.
  • Three levels of draw like the original design, but with an original plunger head. I can never get the right rubber seals, but I've managed to get a solid plastic plunger head at just the right diameter. Less than ideal, but I'm not about to question anything that actually works.
  • Customized plunger rod grip. The original was a bit too big and sharp for my liking
  • Built-in dart holder. I thought about including add-on rails, but I almost never use those except for dart holders. So for a scratch build like this, I decided to just integrate it from the start.

I've yet to use it in an actual game, but the +bow already feels like a very versatile platform. So naturally, this is a work-in-progress.


FRXZ411IY0FZ4SZ.LARGE.jpg


Stage 01

  • All the important parts out of the printer. A few tweaks to the original to account for taste and oversights on my part.
  • Fancier grip than the stock model. Thinner, smoother, and ya gotta have a triangle on it. Did I mention I like triangles?
  • Ring trigger just for fun.
  • Spacer between the front frame plate and the catch frame (dark blue with the obround slot). I only had the plunger body screwed and glued into the catch frame, but that wasn't nearly enough to keep it in place as the plunger head slammed into the far end of the body. Now it's much more solid.

F3TLG9KIY0FZ4T1.LARGE.jpg


Stage 02

  • Added a shoulder stock, designed and built from scratch. I'm not sure the stock actually helps with accuracy, but it looks nice and feels better. I might try to add tool or part storage later.
  • Plunger body shroud. That was actually made as a study in lightsaber handles, so I just slapped it on as the design was superseded. That white space looked empty, anyway.

FLCW0YGIY0FZ4TU.LARGE.jpg


Stage 03

  • After realizing how much oomph this thing really has, I made a barrel for Mega darts. I'd like to try and make a system that would let me toggle between both types of darts like the Dual-Strike, but I might be running into the limit of the 3D printer's capabilities.
  • Empty spot in the stock is being used for holding the extra barrel. The rubber band has since been replaced with Velcro straps, but I'd like to make a proper box for holding tools and extra fasteners.


It's been hardly perfect so far. There's a few sharp corners I've had to deal with, and more than a few mechanical problems. The plunger rod has broken at least three times; if that keeps up, I might try for a paracord solution like I've done in the past. And the plunger head still hits the end of the body pretty hard, so I should probably come up with a solution for that. Still, it's been a very successful build so far.


Pictures and updates as they come.

My first bow homade

$
0
0


Sorry for the lack of sound but as you can see it's a bow. I was bored and say some spare parts Layin around and so I thought I could make something with that this. The base blaster is a crossbolt which I got from a good will and the rest is some pvc and some stretchy string from another toy I had around it shoots pretty consistantly it sometimes jams but typically with older darts. I made this for shits and giggles it's not very practice ranges are desent I would say about 75 feet

1995 Crossbow CAD Files

$
0
0

I haven't modeled the springs yet. I'll add them to the set soonish, then make the STL files available.


STEP 214 Format: http://captainslug.com/nerf/Crossbow95.zip (2.6mb)

c95_11.jpg

c95_12.jpg

The internal parts are 100% measurement accurate. The shell however isn't exactly dimensionally perfect. It's been altered for improved strength and more compatibility with 3D printing (hopefully).

Less-painful springs

$
0
0

Does anybody know of a spring that hurts less for a homemade. I usually play indoor matches and I don't want to hurt other people while playing. I'm not the most experienced with homemade making and I don't know if I should instead change a different part so please correct me if I am wrong.

Xellah's Bullpup homemades

$
0
0

I recently discovered the magnificence of Xellah's bullpens and was wondering if there is a writeup for building one. I thought about contacting him but he was last active in July of 2016 so he probably won't answer. Is there an email address that he checks regularly? I found this writeup by Polycarb but it doesn't capture the full beauty of Xellah's bullpups. I believe it would be rather hard for me to recreate the design from scratch without something to follow because I am rather new and this would be my first homemade.


high volume vs high pressure bike pumps

$
0
0

I started my first homemade(s). I'm a recent Nerfer (wife's awesome Valentines day gift) - Mostly to relieve work stress by plinking down empty water bottles. I started getting some with the intention of modding - a retaliator, a hammershot and cycloneshot but recently I've been looking at making a spring and air powered blaster.


I'm looking forward to finishing up my spring powered blaster, but holy hell air powered blasters are amazeballs. The only thing is my pump was a cheap bike pump that seems to be geared for high pressure - so it actually hit's over 200psi.

While it can hit pressures that high, it takes forever to pump to standard​ levels, and high pressure is rather pointless. I'll probably look for a way to limit this to 30-40 PSI instead. Using a QEV on my prototype.


This is from ~85 PSI - nope, not running that much in the house...

1Eskfwl.jpg


Does anyone know of a good High Volume​ bike pump? Rather than pumping 20 times to hit my pressure goal I'd rather pump 5 or 6 times...


Also what are good ways some of you attach the base of the pump to your frame? I can see this taking a lot of stress.

THIS one simple design will have you in TEARS...

$
0
0

Hello, everyone! I have been dead for a long time on here. I'm back for today because I couldn't keep this a secret any longer. THIS PROJECT IS ALMOST COMPLETE, this is not a full write-up. It loads and fires but has a bad seal. I can fix that but I don't have time--I haven't touched the project or even the tools in many months. That's why I'm just gonna show you my thing and let you do what you want with it.


No official name but let's call it the Sex Pistol for now. First person to perfect it gets to rename it. But do you really want to?

gun one.jpg gun two.jpg


The biggest inspiration was the Multiple Orgasm, by makeitgo. The day I saw that thread was the day I finally had what I needed to make the SP. Let me tell you, I had some far out ideas about how to make a mag-fed pistol, none of them realistic.


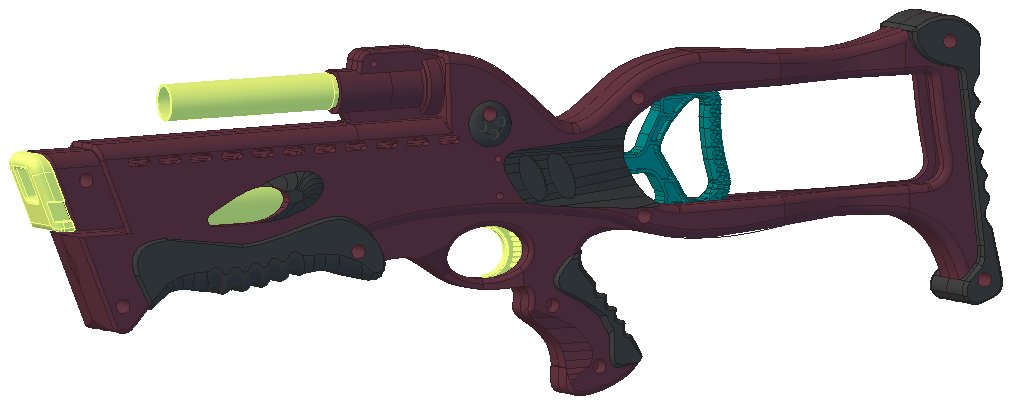
The Sex Pistol is just a like a real pistol. You can load a magazine in the handle, cock the slide back, slide returns forward, you pull the trigger, dart leaves the barrel. It's got some weight to it, feels good in the hand, and is 12" long.

ANIMATION of sexy 1st design


Of course, nothing stays the same. I've changed some moving parts when I found out that the real world isn't the same as the 3D model world.

VIDEO of sexy man cocking and dry-firing the Sex Pistol


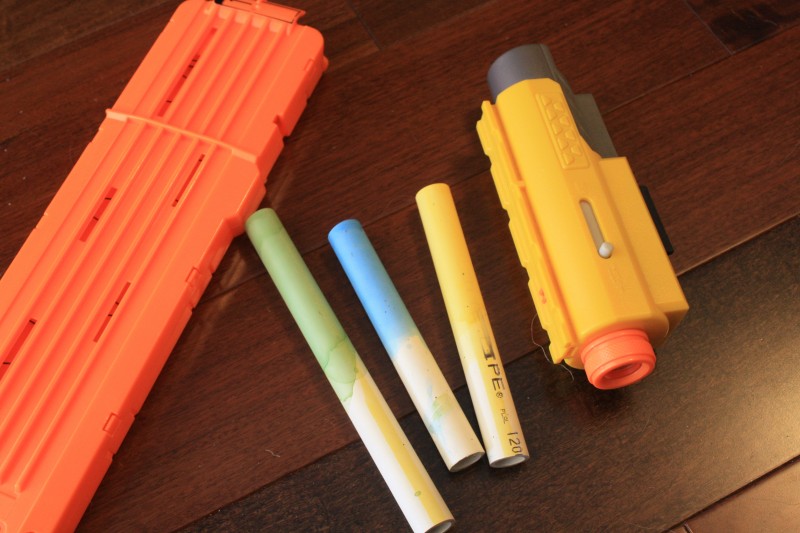
The best change I made was the way I made the handle and the magazines. For the handle, I used a heat gun to soften the 1-1/4" PVC and then shoved two lengths of 1/2" PVC inside, side by side, to "spread" it from the inside. While it cooled, I pressed it between two wooden boards to flatten the sides a bit. The result is so comfy and strong. For the magazines, you can do the same with 1" thin-wall PVC, with two lengths of 1/2" CPVC inside--OR you can shove the softened 1" pipe inside the handle you already made. As it cools, wiggle it around and slide it in and out--this will keep it from hardening and getting stuck. You can cool the pipe faster by spraying water on it. ALL OF THIS SHOULD BE DONE IN A VENTILATED AREA--some, like Captain Slug, would suggest that you also wear some kind of respiratory protection.


The coolest change is the way the slide can be locked in the cocked position to allow for easy magazine swap. This came about from a design change where the magazine would be "closed" at the top which wouldn't allow the dart-retainer-lips-things to spread around the bolt. I like this feature, even if the magazine lips are open and allow the bolt to pass through. You wouldn't need this slide-lock if you decide not to add the slide return spring, which is on the barrel and pushes the slide forward after being cocked. But why wouldn't you want that?! It's so cool!

VIDEO of sexy man poppin' and lockin'


The most difficult change was the damn "mobile" catch and trigger assembly. The first reason for this change was that the plunger and catch would slide back in the plunger tube, instead of firing, when the trigger was pulled. Only way to stop that was to hold the slide forward with your free hand, which is dumb. The solution was to come up with a trigger that pushed up or forward or both. I went with the one in the middle on the left side of the animated image linked below. The trigger is a length of 1/2" CPVC, with a hole cut out to allow for the gray flexible trigger-catch-pusher-thing. The gray strip is just thin metal with a rounded nub of plastic glued on it.

ANIMATION of trigger designs


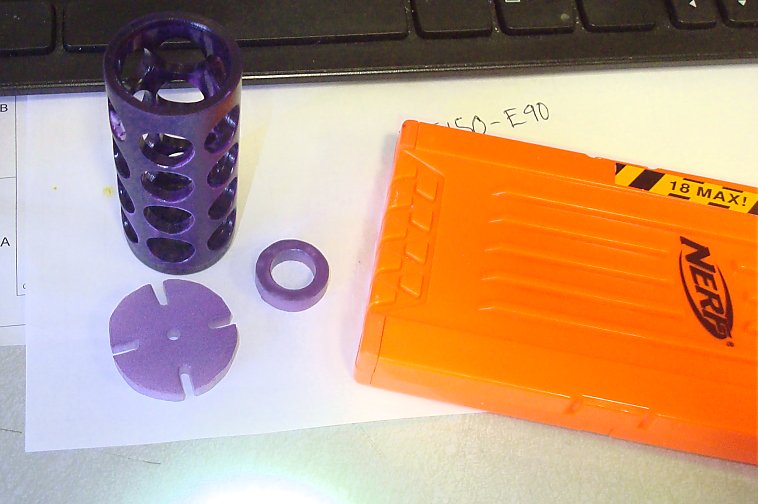
The second reason was that the simple 3-layer catch shown in the animation was not easily fabricated with my sexy Dremel and wasn't strong enough. The result is a big ugly thing but I believe it is an original concept. Imagine the plunger entering from the right, catching on the ring in the middle. The trigger pushes up on the ring, which is bonded to, and flexes up on, a strip of CPVC extending from the CPVC section that is the left end of the catch.

20151207_175054_HDR.jpg


There are a few things I designed that I'm pretty sure are new ideas. Dammit, I give up, I'll just have to get better pictures tomorrow. I haven't updated the model so you won't like it if you see it. Even if I wanted to, my computer is too old to be sexy and can't even install AutoCAD properly.


A few little notes:

-Magazines can be made any length but mine is currently long enough for 14 darts

-Magazines can fit darts up to 1-1/4" in length

-Ranges aren't expected to be impressive, even with a perfect seal. Current stroke is 2-3/4", I believe, which is pathetic, I know. That's just how it is, unless you make the pistol longer.

-I know it's big but it's also smaller than you think.

-Here's a Google Drive folder with all the pictures and videos and maybe the .dwg model file thing.

-Another fitting name for this pistol is Pillow Talk. I was gonna say something gross that rhymes with "eremature pjaculation" but I didn't. Also, it's full unofficial name is Sex Pistol: Experimental Reloading Mechanism.


One more thing. When I was about halfway done building the first crappy prototype that barely held together for a few days, I emailed the guys that print and sell ESLTs and PullSCRTs. They said they'd print any design if you were willing to pay for it. The price they gave me wasn't sexy and they said my model wasn't printable. That's fine, no hard feelings. I had laughs and tears working on this. Thank you guys for not stealing my concept and making it better and printable.


Okay, I'm spent.

Bullpup Bike Pump Sling Blaster Design

$
0
0

So I've got an idea brewing in my head.... This is what I've got so far:


Side view

0d3a2fc1c51d7ae1b9103a3e5f7b0d1f.png


(top tier windows paint skillz)


Top View:

50aaaf324de4c680e62e2932bc8a025a.png


So the idea is you take the bottom off a bike pump, replace it with a PVC end cap, followed by a series of pvc Elbows, all leading up to your barrel of choice.


You attach that to a wooden body, with the trigger up front. Then using either extension springs or heavy duty rubber as the power source.


To prime it, you step on the Foot Bar, and pull the blaster backwards. OR you point it downwards and use your foot to prime it.


The design seems simple enough. It comes with an easy, already prepared perfect seal plunger tube and plunger.


The problem I'm encountering is, how do I make the trigger catch??? Thoughts? Suggestions?

Alternatives for a ball valve

$
0
0

You know how on most nerf air guns, there are the little button the trigger depresses when you pull the trigger that lets the air out? What is that little button called? Where can I get something like this mechanism for a homemade? If not, then what are some alternatives for a more ergonomic ball valve? Thanks.

Tips on getting polycarbonate or other modding material scraps.

$
0
0
We all don't like spending the large amount on sheets of polycarbonate. This is a quick little post on where you can sometimes find polycarbonate scraps or other modding materials.

1. Schools:
If you have a construction or mechanics room in your school, there may be polycarbonate scraps. At my school the younger grades make a piggy bank with a polycarbonate side. Chances are, if you ask the professor he'll let you take the scrap pieces. Schools can be a great place to find scrap bits, but make you you ask politely, or otherwise you'll ruin your chances.

Construction labs can also carry some wood that you need in your next homemade. The vast majority of rooms have a wood scrap bin. Like with the polycarb, just ask the teacher and they may say yes.

Other than that, materials can be anywhere! I once found a piece of sheet metal on the ground and the teacher let me keep it. You just have to keep your eyes out and know where to look, and when to ask.

2.Thrift stores/ Garage sales
People sell and donate random things, you may get lucky and find springs or pvc.

3. Hardware stores
Look out for sales and discounts. Also, sometimes there may be a scrap bin for wood or tubing.

Spare library cards or any useless card can also be used as a substitute for polycarb (but that's only if you have nothing else).

This was just a post on saying that materials can be found anywhere and you just gotta know where to look. Also this new noob is trying to be useful at NerfHaven😉.

Thanks

Bubba

P.S if the moderators feel like this is absolutely useless, feel free to delete this topic.
Edit: Now that I think about it, this may not belong in the homemade section. Moderators please move this if you don't' think it belongs here. Sorry.
Viewing all 167 articles
Browse latest View live