Quantcast
Channel: NerfHaven - Homemades
Viewing all 167 articles
Browse latest View live

K26 spring unavailable in Australia

$
0
0
Hey everyone.
I was wondering if there is any way to obtain a K26 spring in Australia. McMaster do not ship to Australia and they are not available anywhere else. Is there any other way? Thanks.

Snap pistol help

$
0
0
Hello I am wanting to make a snap pistol and need help with a list and how to. I am going to use it for wars.

PCSR: A new homemade design

$
0
0

For everyone asking about the 3D files, yes I will post them when they are finalized. I never post stuff that isn't war tested or completely optimized.


Preface

The ESLT is one of those blasters that is ubiquitous throughout the community. You see at least one at every war, and the [EDIT: stock] performance just does not live up to the hype, at least not without significant upgrades to the design. The seal leaks in both the front and at the plunger head itself, the "plunger rod" is a specialty component that can only be made if you have a lathe available;  any seal that might have been made at the front redirect piece is broken the second that rod starts moving. Overall, you're left with a blaster that approaches double rainbow weight with modified rapidstrike performance. While ideal for indoor skirnmishes, to say this competes with rainbows and SNAPs is, (as far as I'm concerned) an outright lie. This prototype, soon to be production, blaster is meant to be the next evolution of the ESLT and combines my experience with rainbows, solid modelling, and actual nerfing to create a blaster that fills all the roles previously described.


Objective

Create a blaster that is shorter than a traditional rainbowpump, with a muzzle velocity comparable to that of a low end rainbow (>220 FPS).

Create a blaster that weighs less than the ESLT (<3 pounds, 4 ounces)

Allow for quick change of barrel, (<30 seconds)

Allow for quick user servicability (Replace spring and back up in <2 minutes.)

Allow for easy lubrication (No special tools to lubricate)

Solve the leaking issues of redirect blasters

Use 3D printing where applicable to provide an ergonomic blaster experience.

In short, Create what the ESLT SHOULD have been.


PCSR: Pumpaction Compression Spring Redirect Blaster

(or Politically Correct Soviet Russia, depending on who you ask)


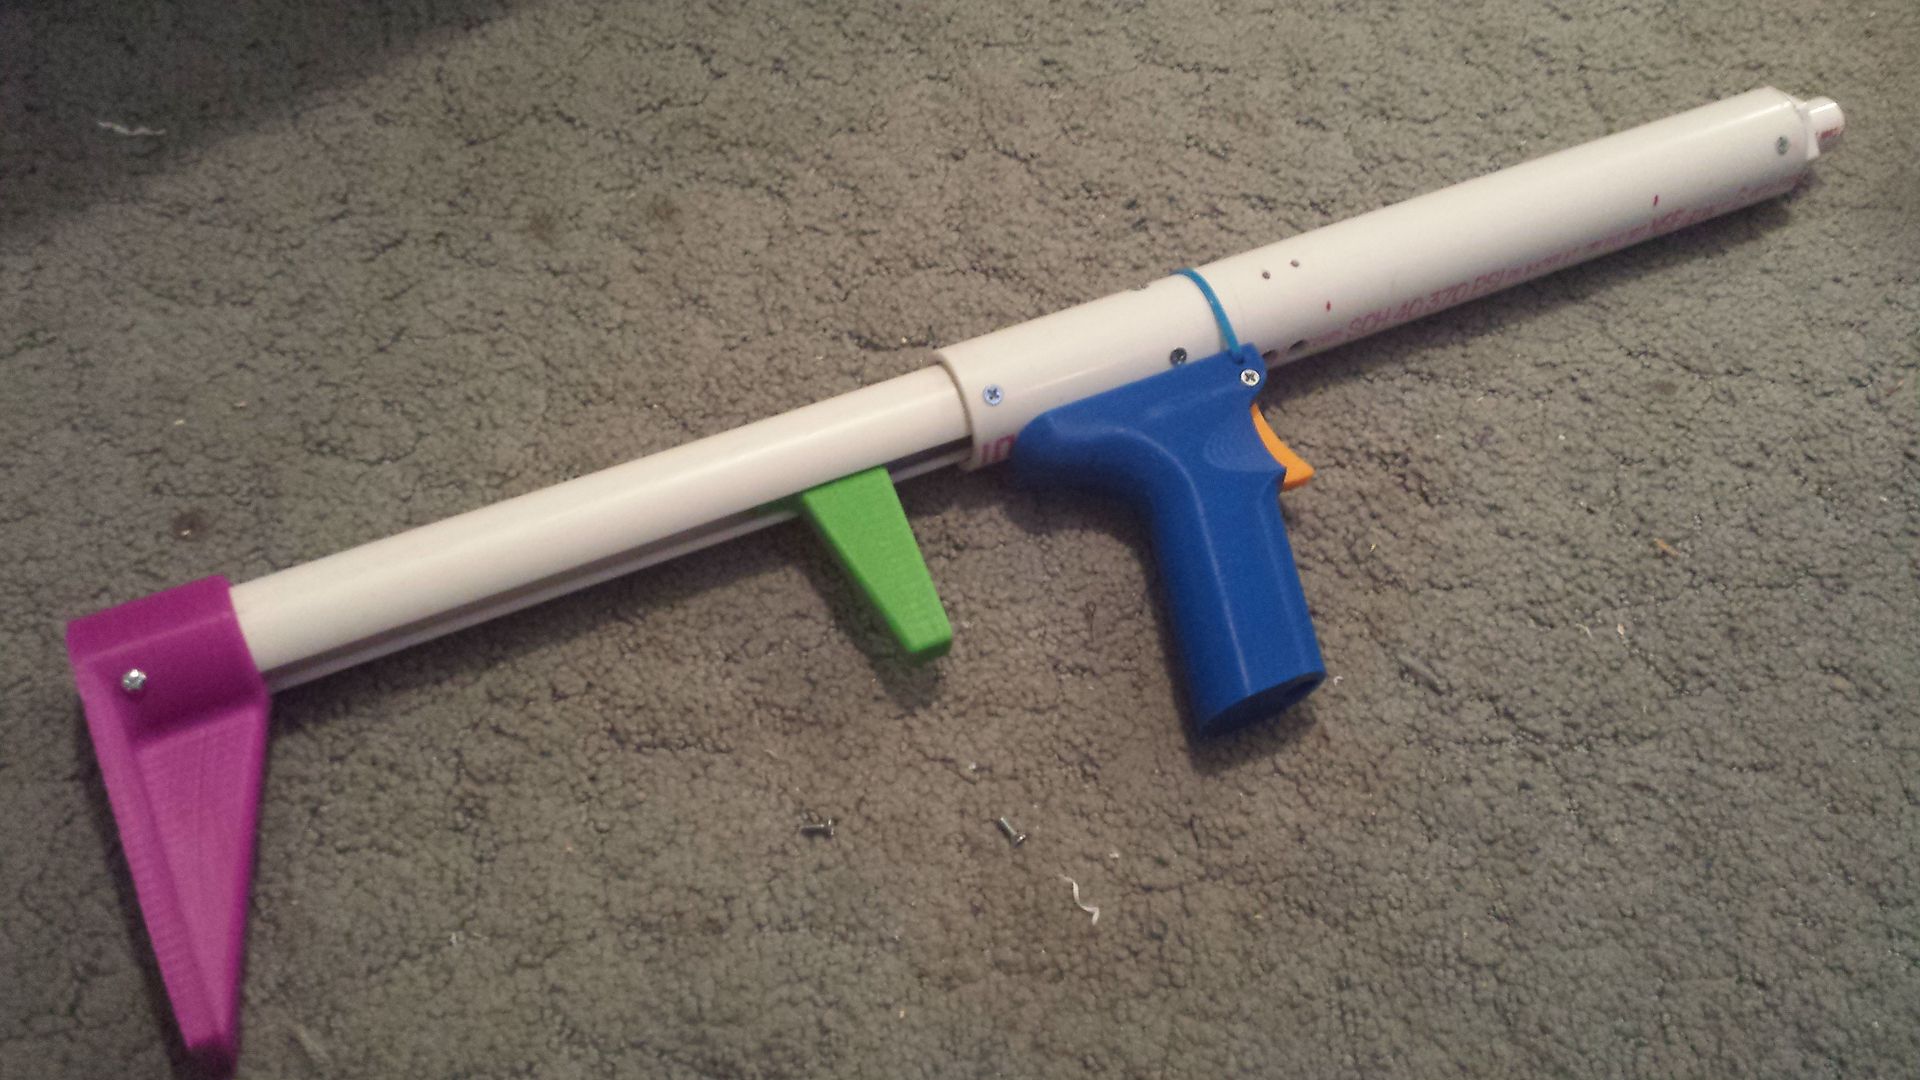
The prototype looks a little different than the initial model, so bear with me here. Operation, however, is identical.


original_zpshrl3rpwq.jpg

This was the original design from back in August. School brought blaster production to a hault until now, but I am very pleased with the results. Let's take a look inside, shall we?


fired_zpshk25zhnx.jpg

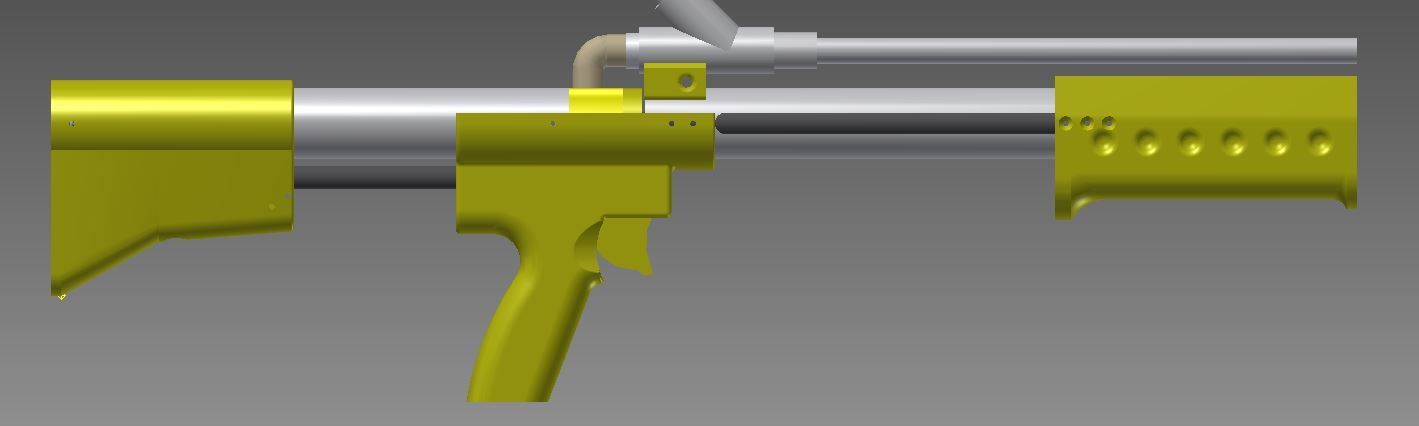
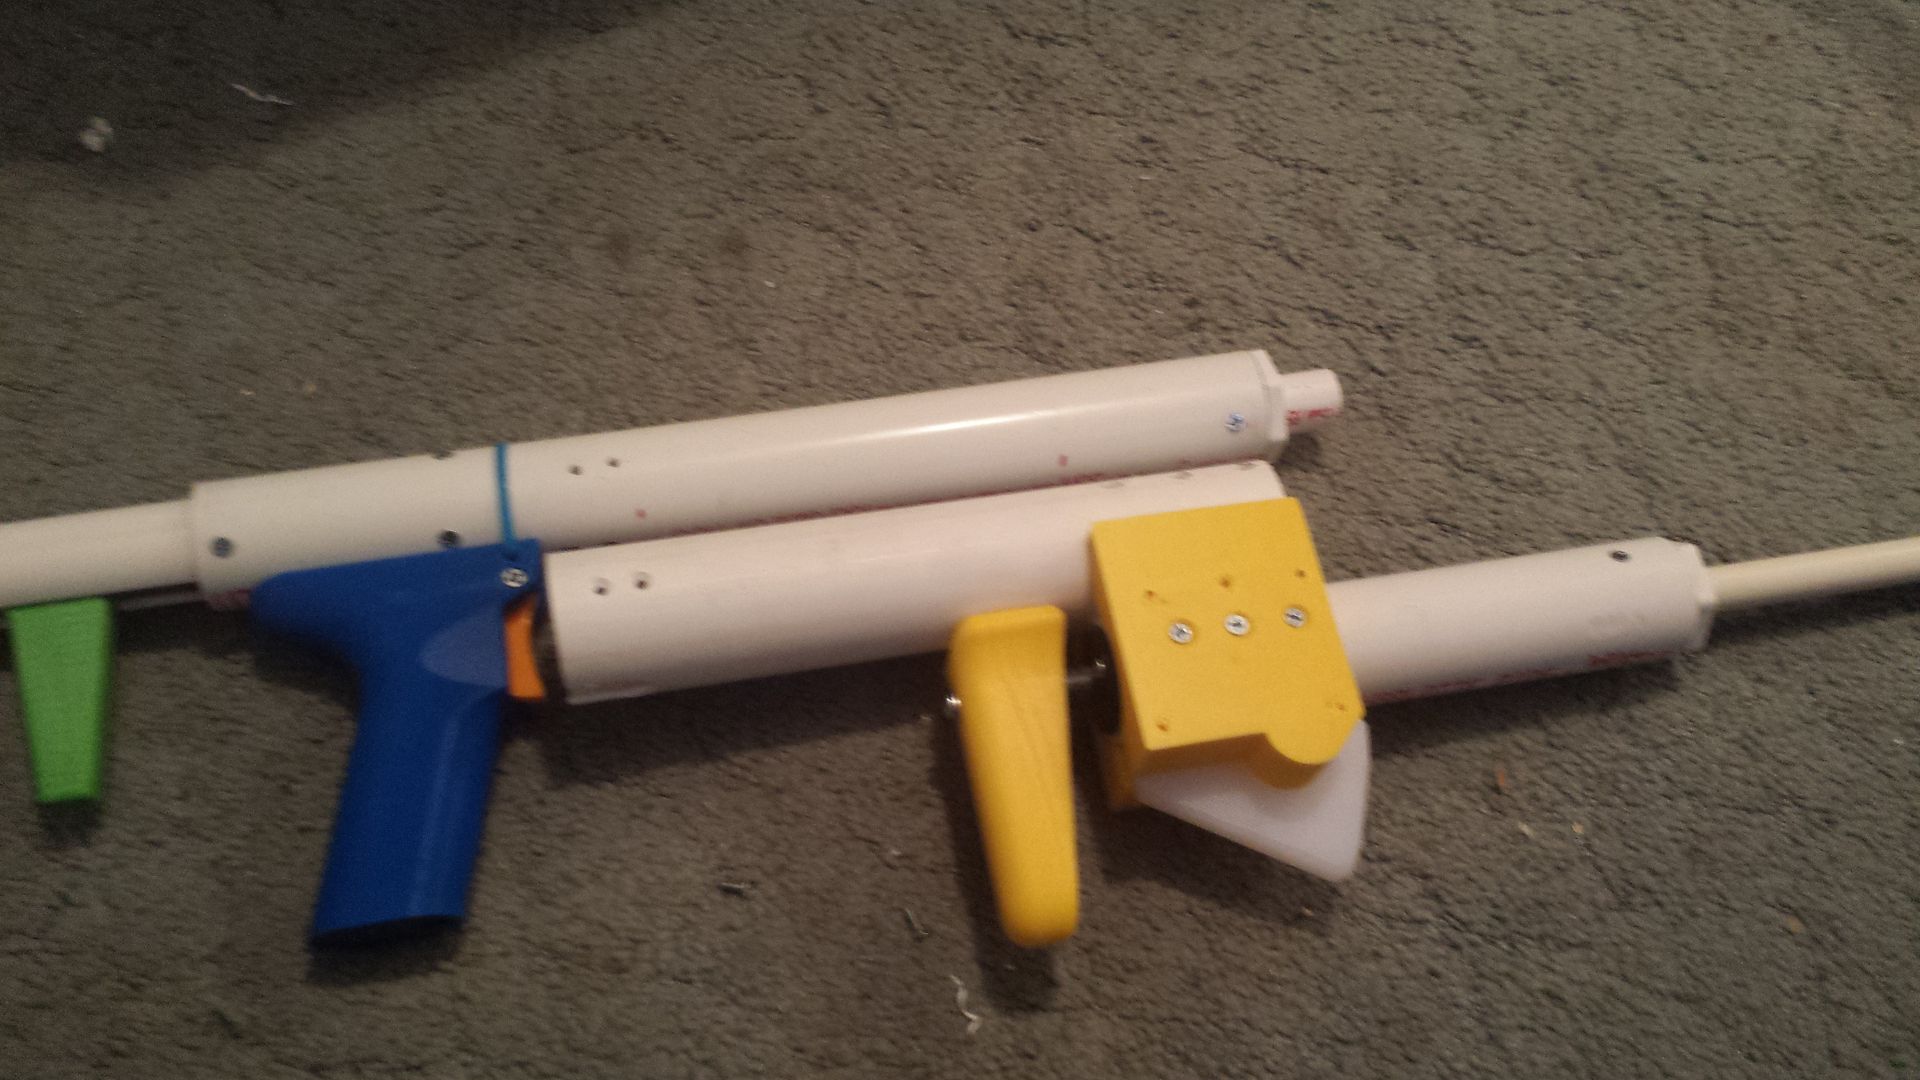
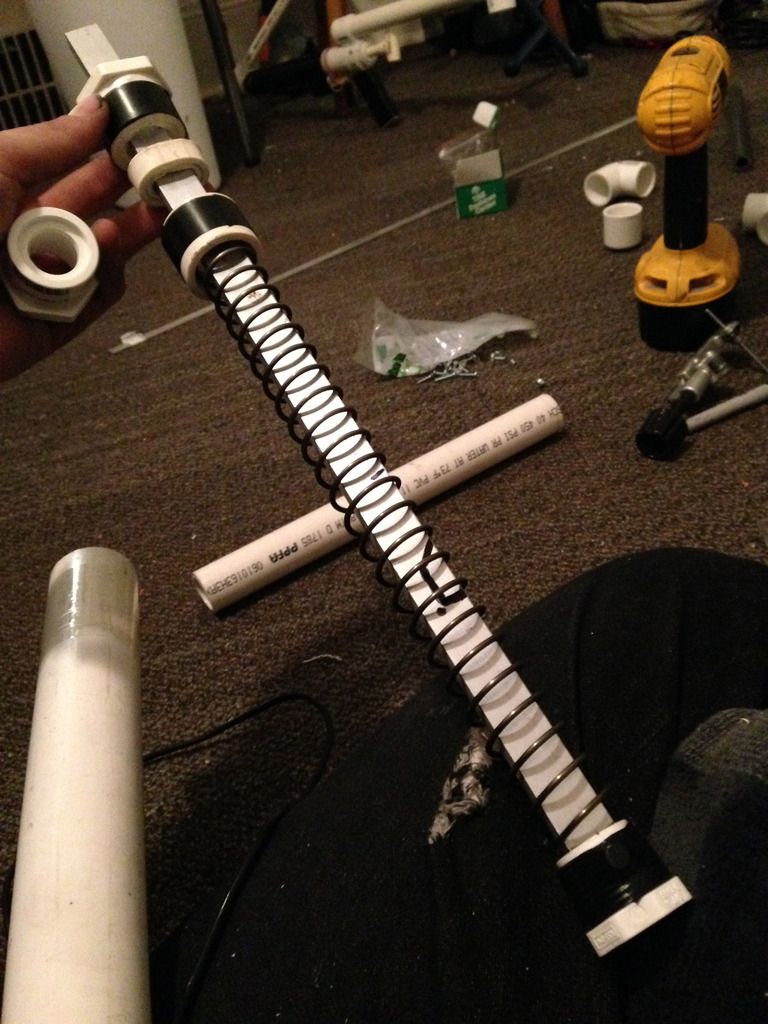
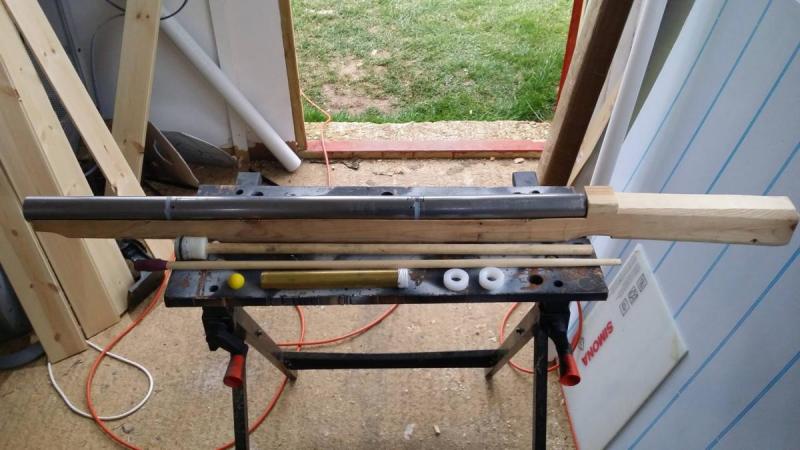
This is the beauty of the PCSR. There is no forward barrel rest like on the ESLT, so that barrel up there can be any type and any length of barrel you want. So whatever's already on your Rainbow/SNAP at home? throw it right on here and it will work with YOUR DARTS and not proprietary darts that only one person makes. And that main energy spring in the back? It's a K25, and can be subbed out for a K26 with the removal of 2 screws. You can upgrade or swap out your spring in under two minutes with nothing more than a screwdriver. So if you're indoors and don't feel like blowing holes in people, you can put in a weaker K25 spring and an 8 inch pistol barrel, or throw in a K26 and a 14 inch barrel for outdoors play.


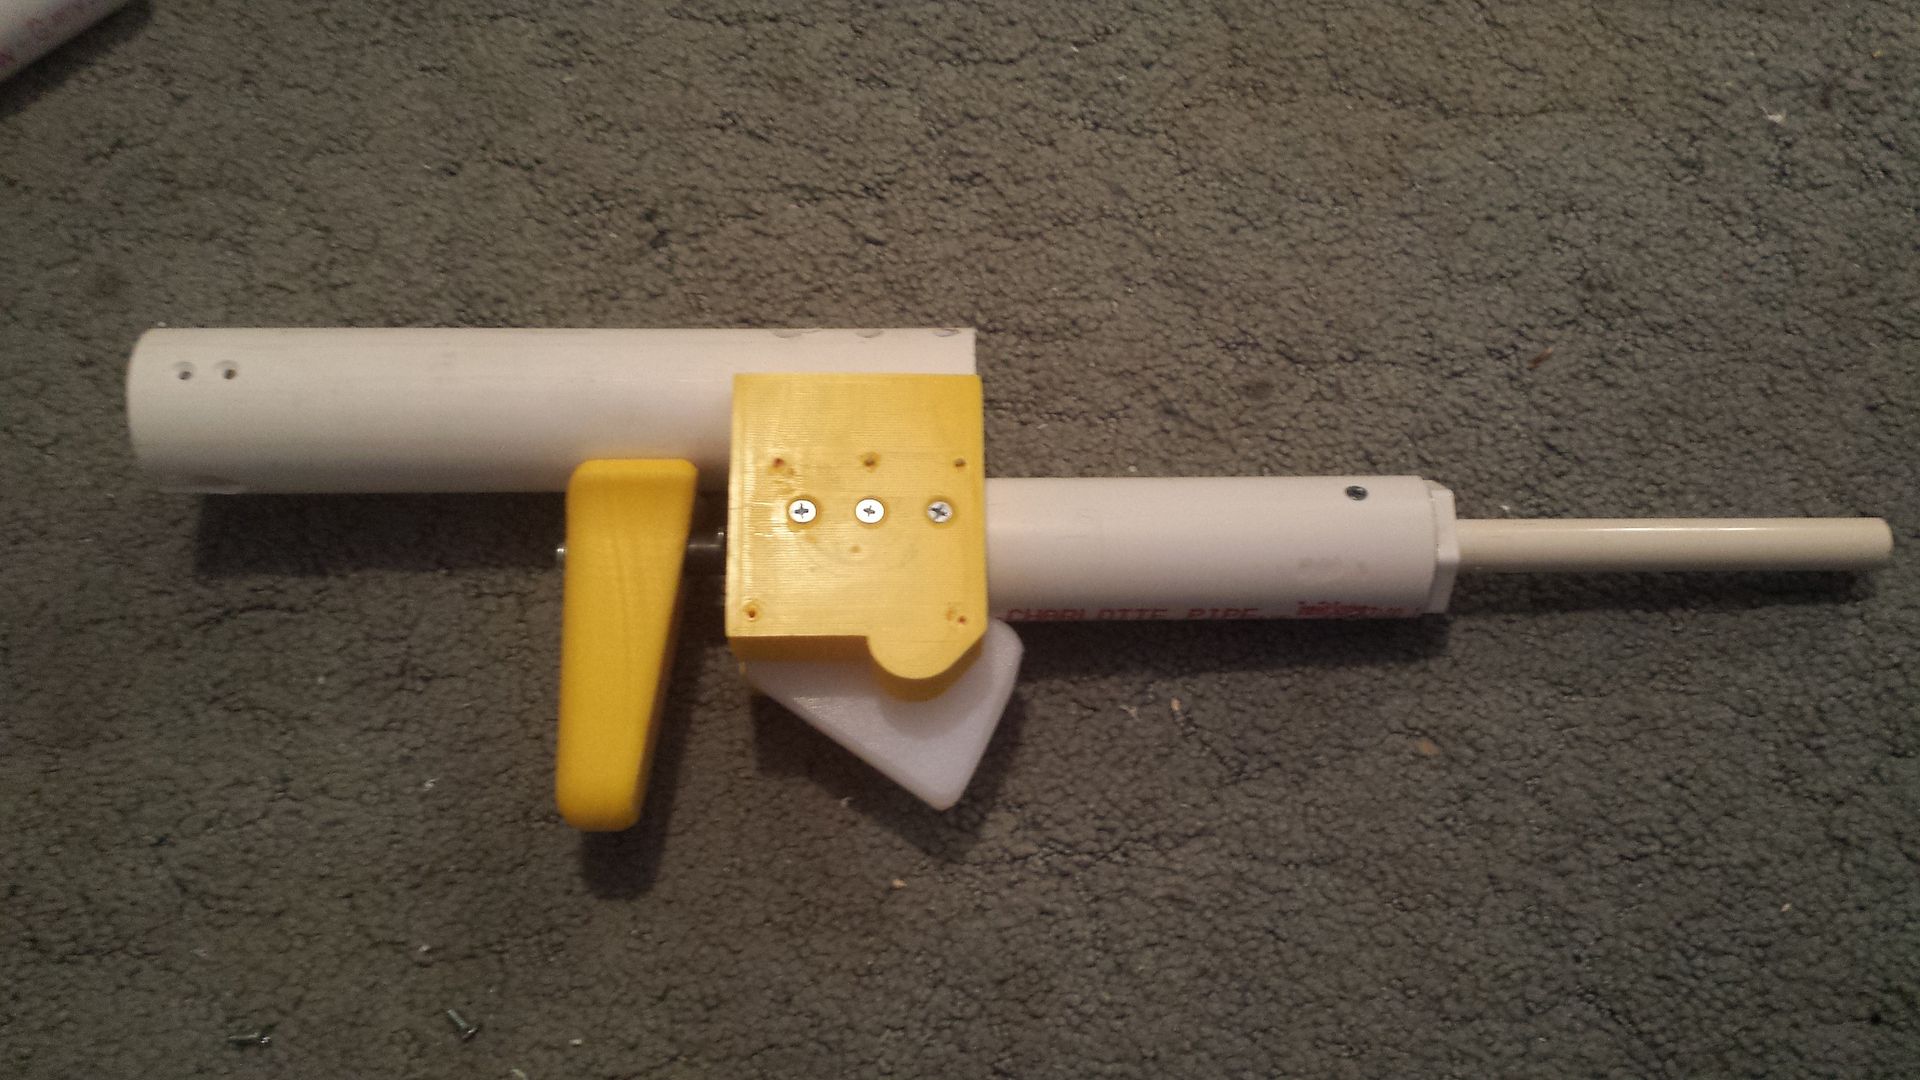
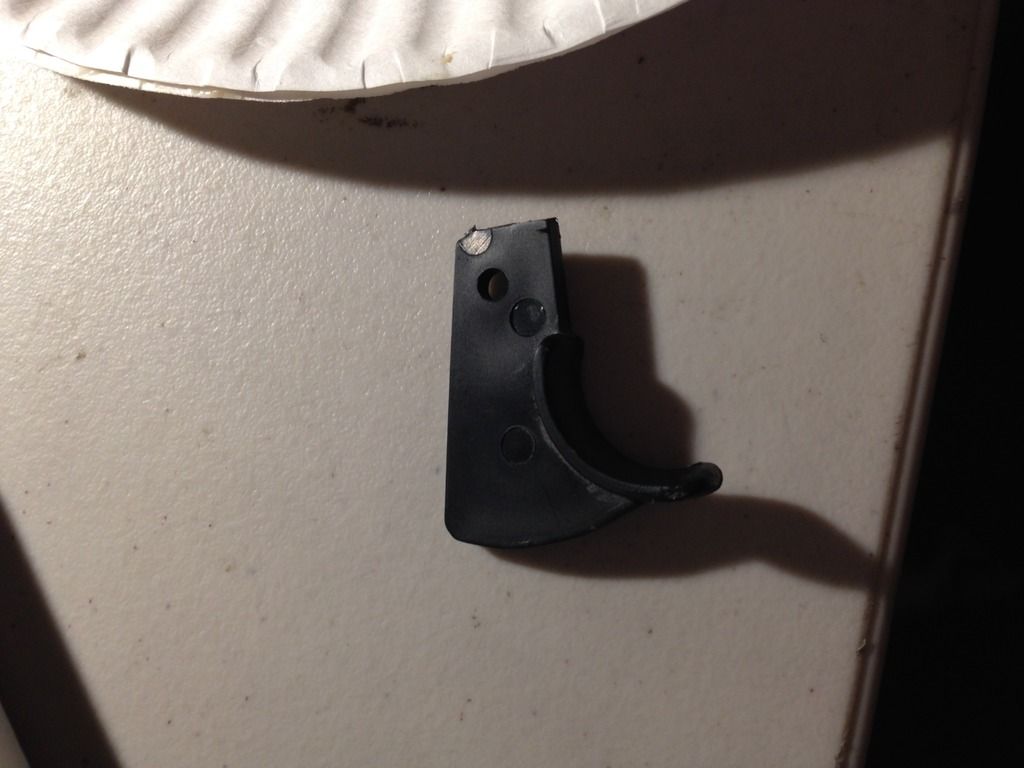
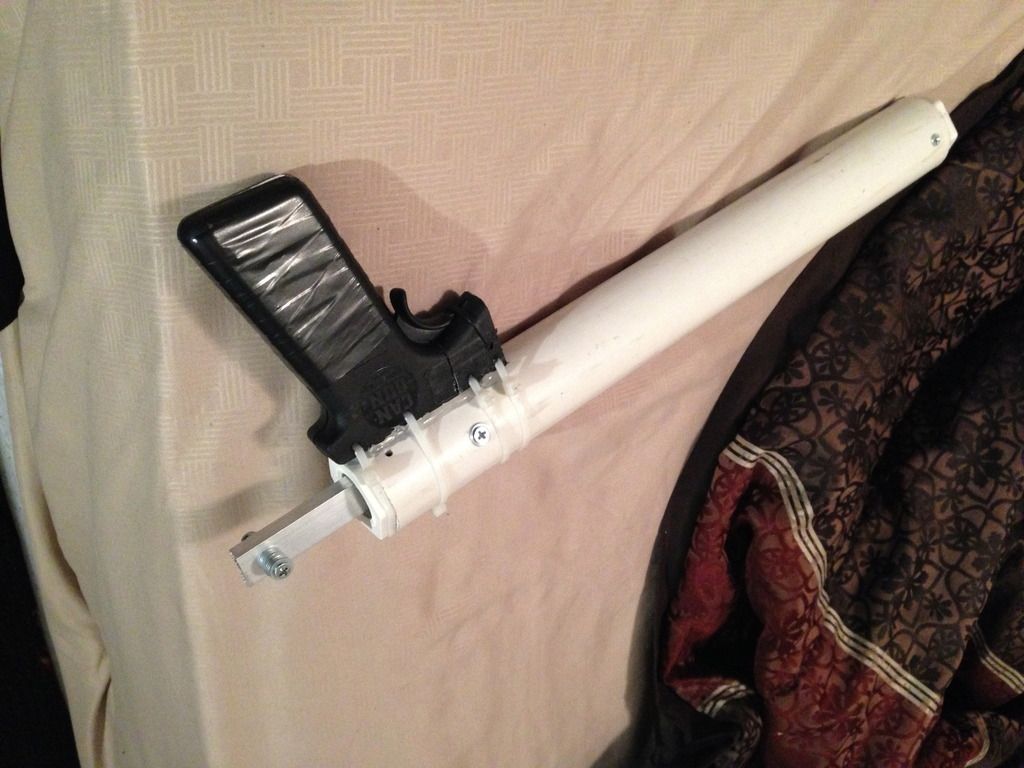
Back to operation: The trigger is connected to that black nylon rod on the bottom. That rhinocerous shaped piece in the stock is actually the catch, it is pulled forward by a rubber band wrapped around a screw just in front of it (not pictured). It catches in the little recess in the floating piston and that's what locks it in place. You'll see in the next photo.


pumped%20back_zps2rnuyd0a.jpg

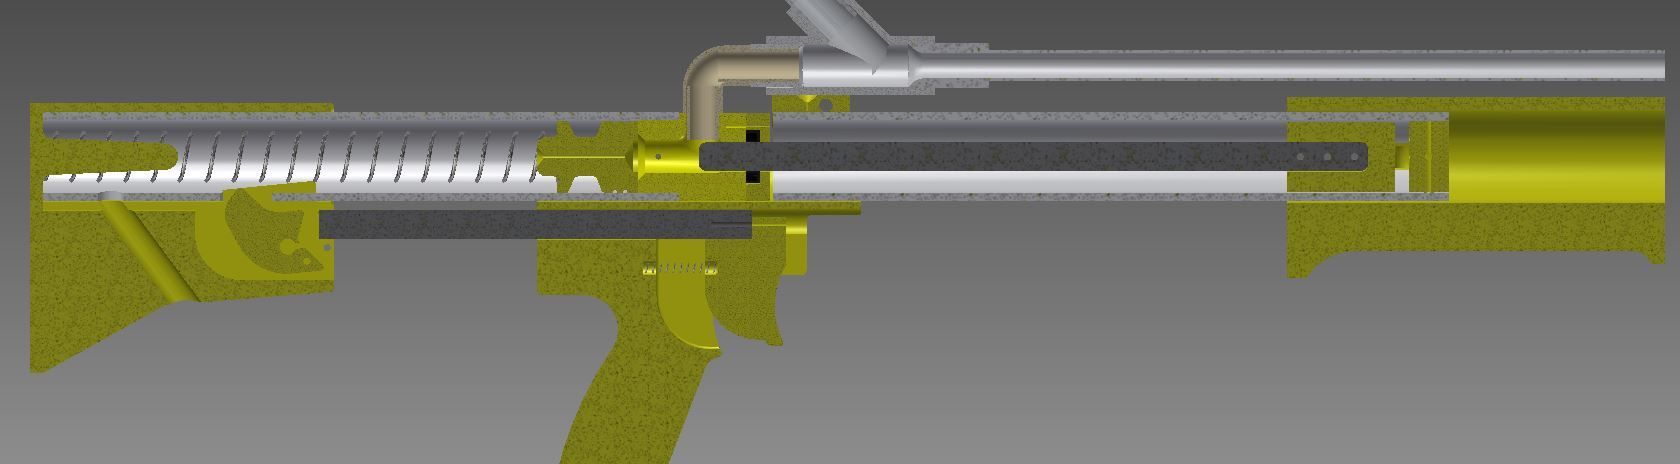
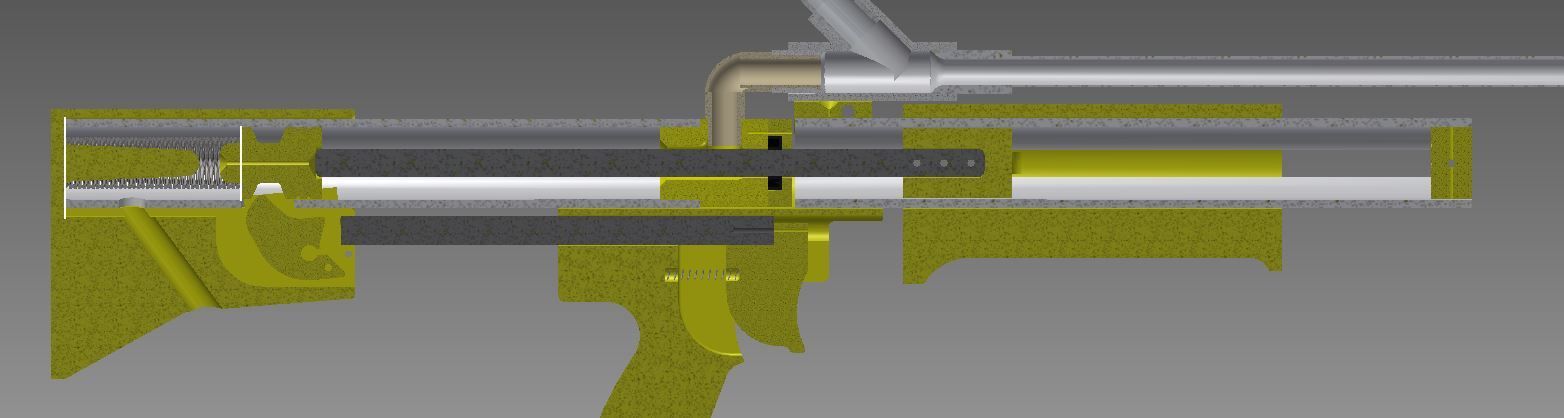
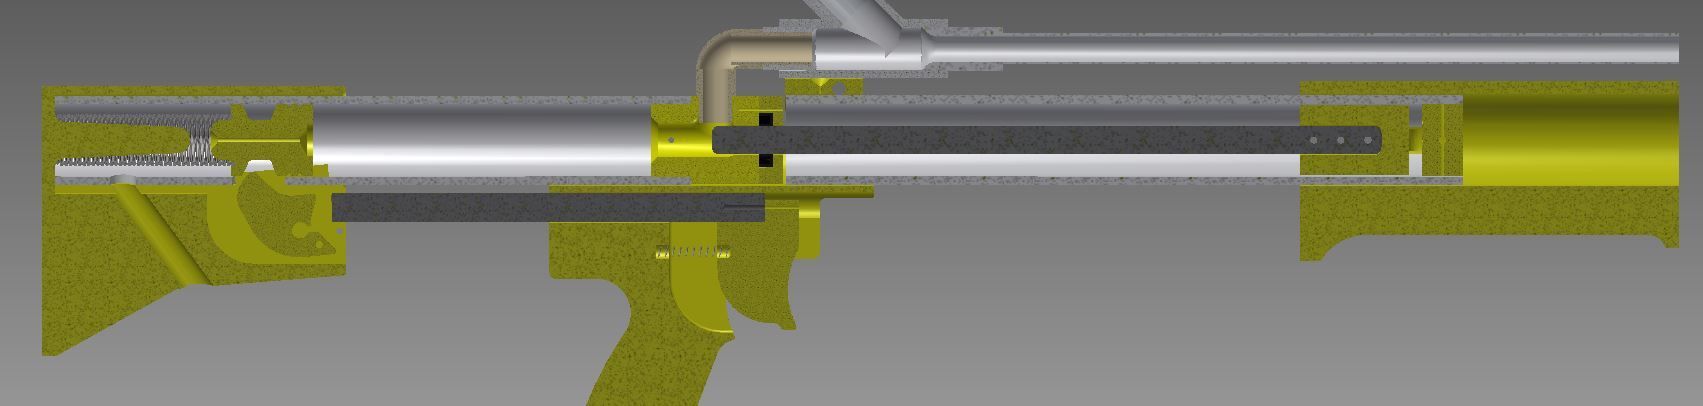
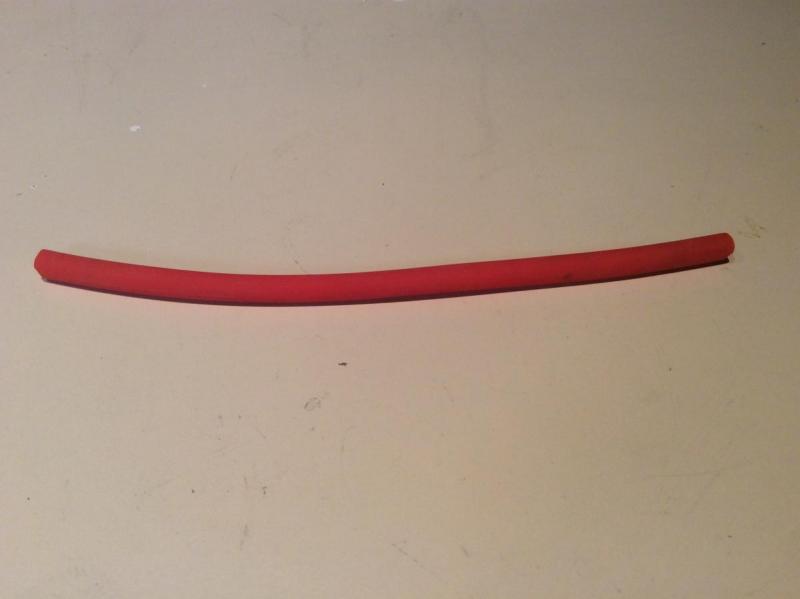
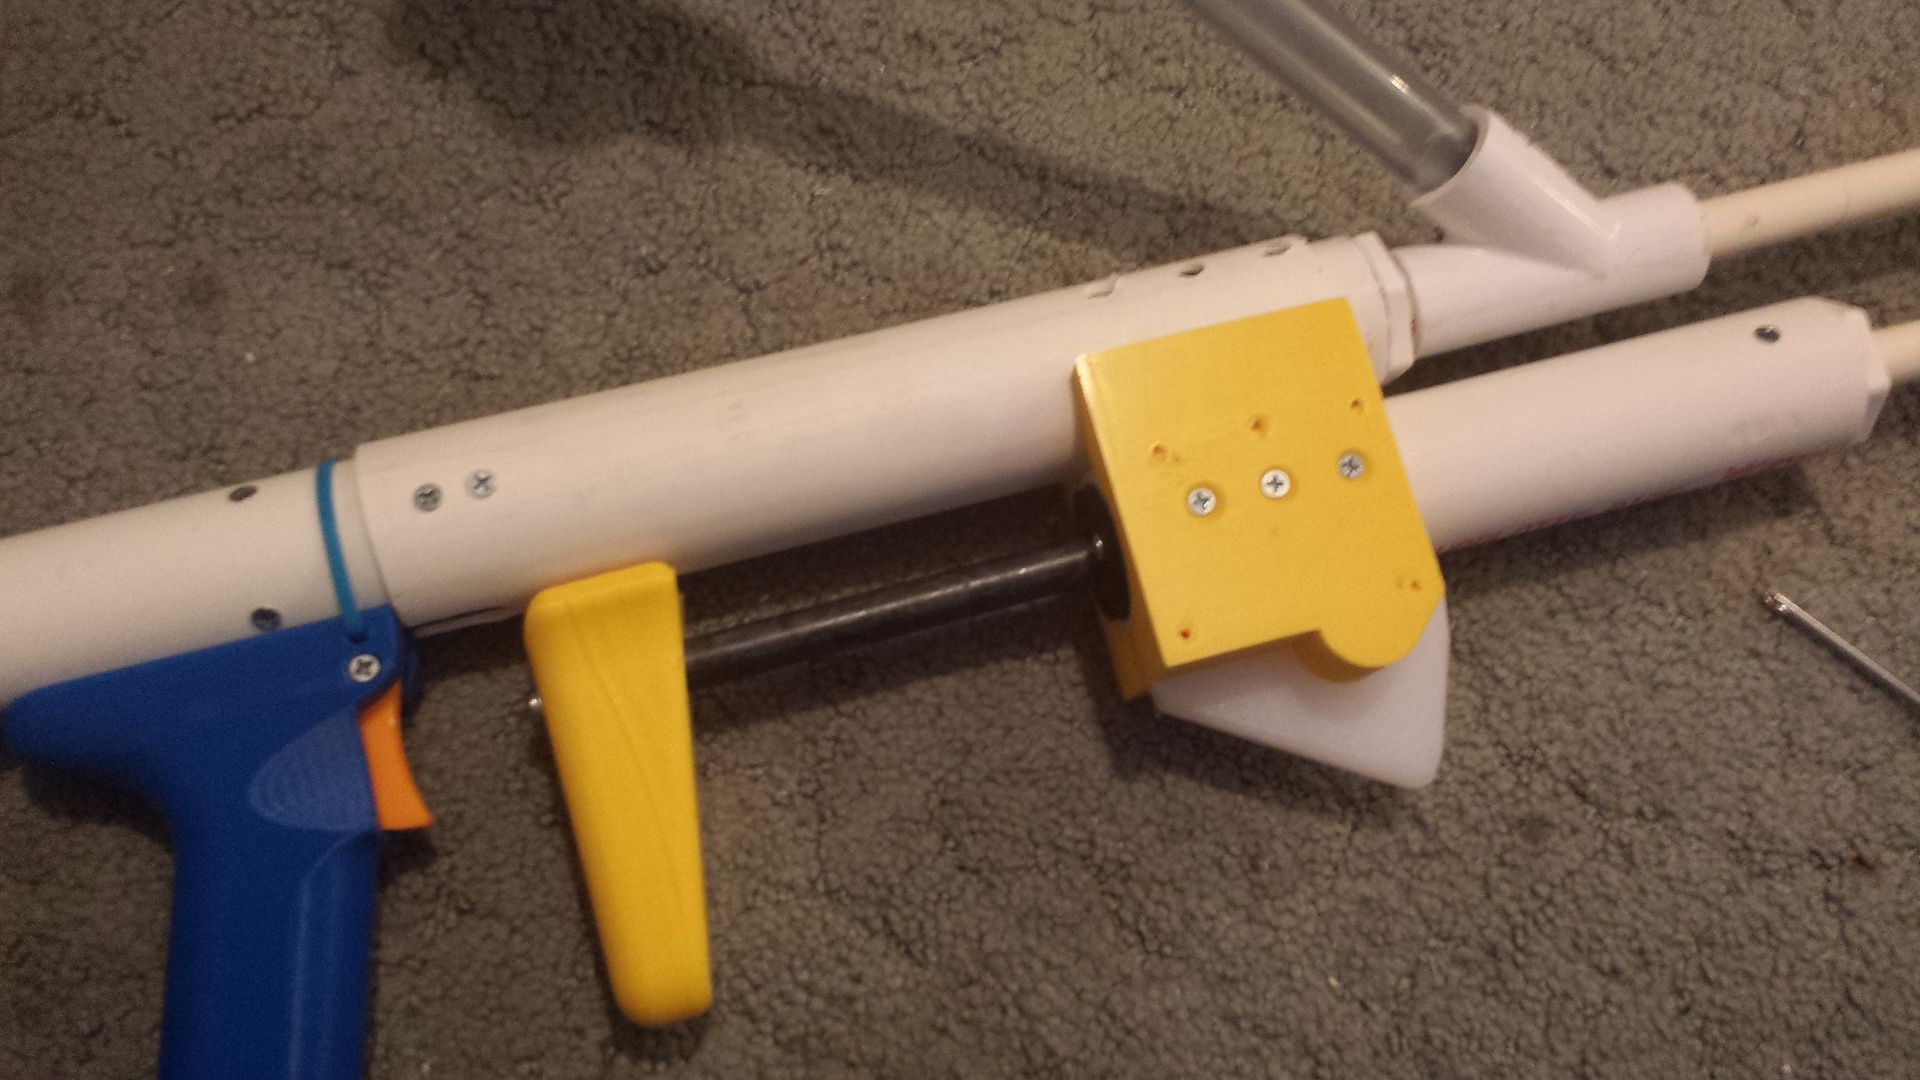
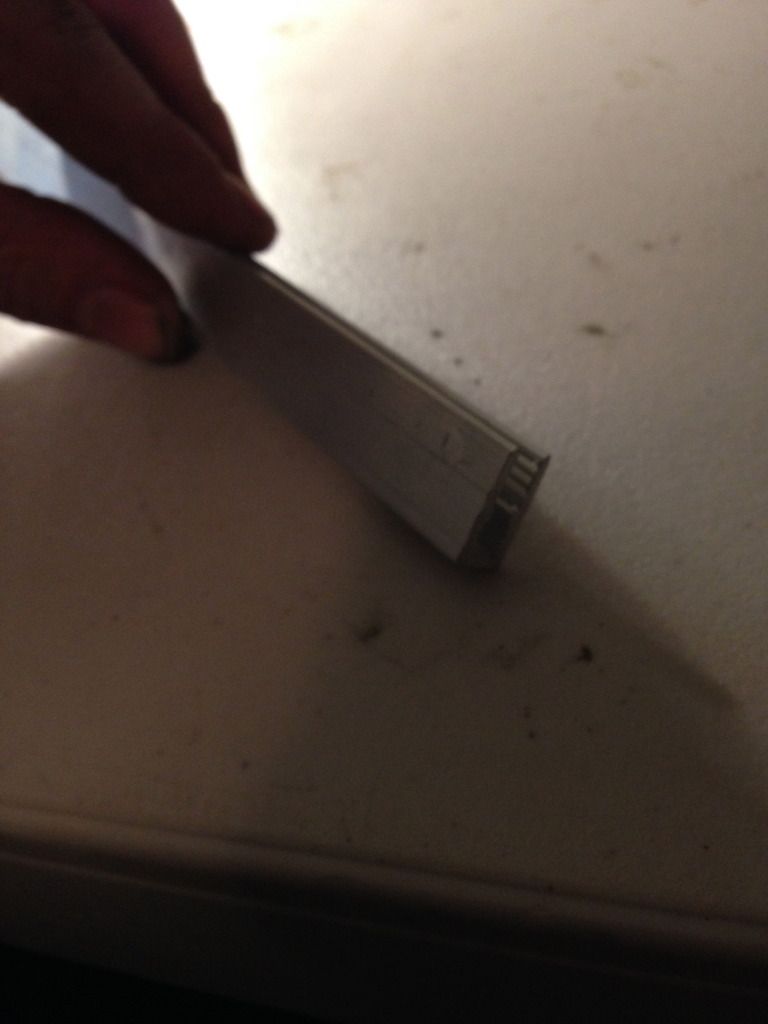
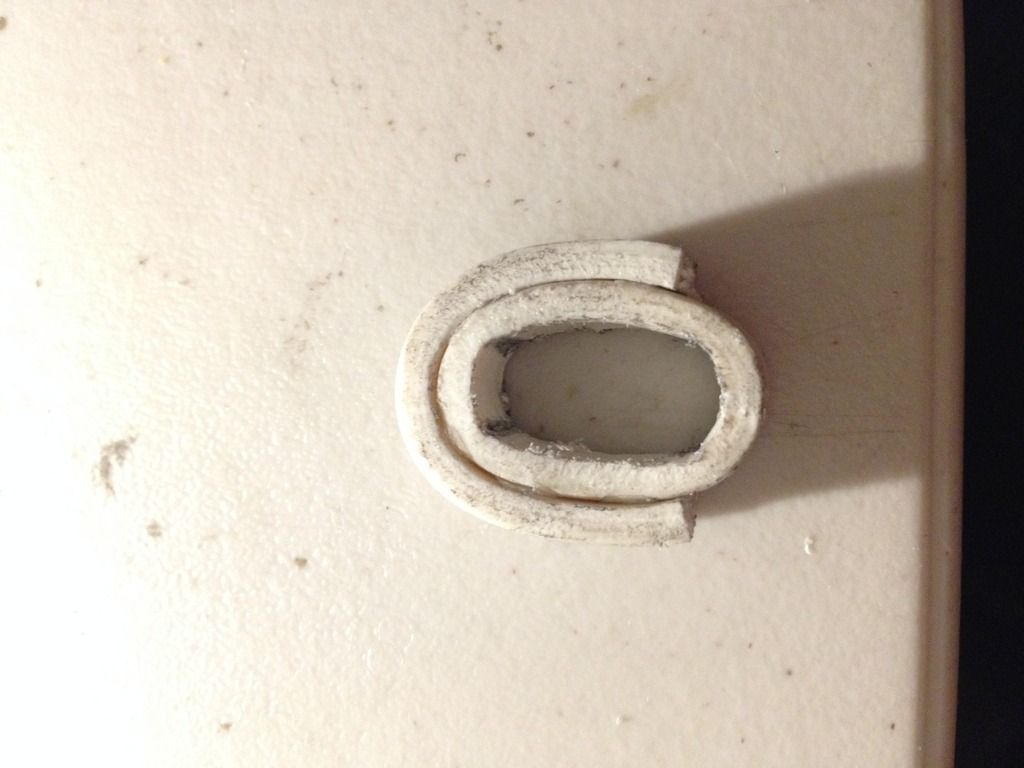
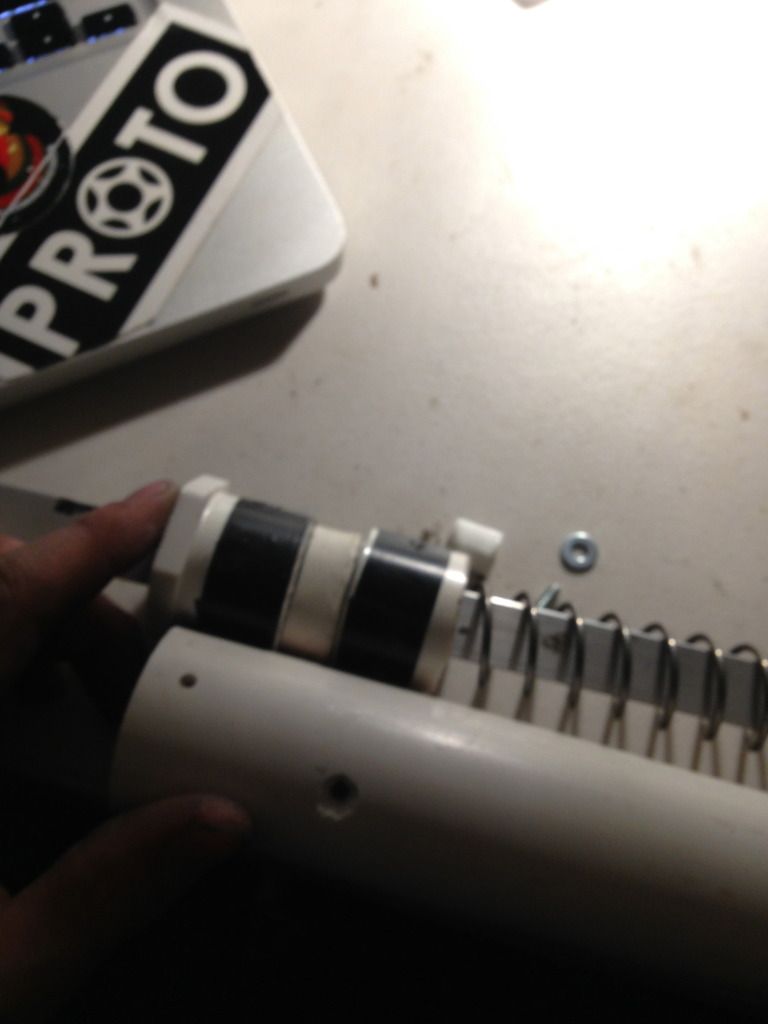
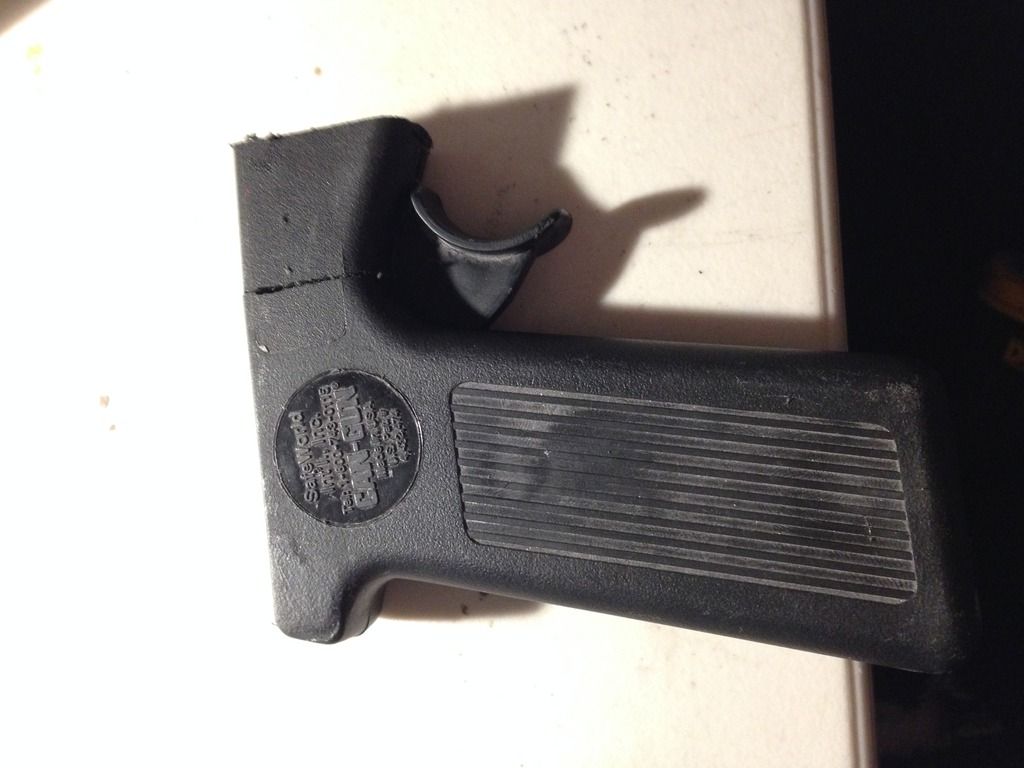
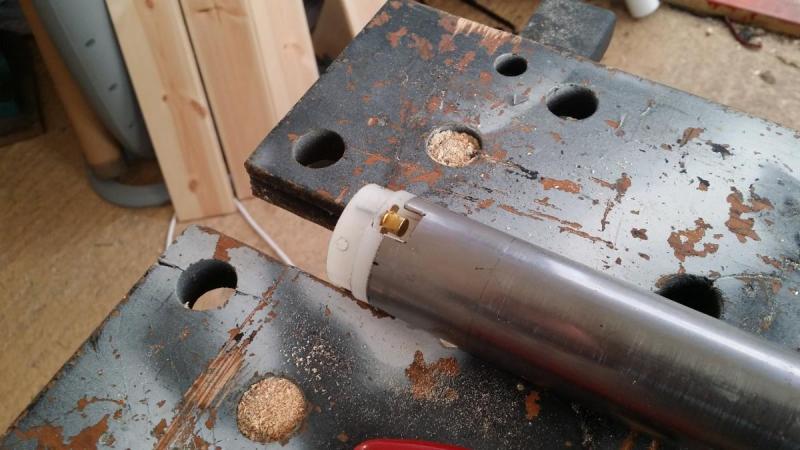
That stock-catch moves up and catches in the recess of the piston. This is what locks it in place. When the blaster is primed, the pump is pulled back and the nylon rod in the main tube pushes back on the floating piston until the piston is locked back. See that little black piece in the redirect piece? That's a specialty McMaster component that costs a touch more that the o-ring that the ESLT uses, but ACTUALLY SEALS AGAINST THE PUSHER ROD. It's used in pistons and actually creates a decent seal. The whole seal on the prototype isn't perfect, but I have concluded that's because I messed up the normal "goop seal" and the next one should be better. Still seals better than an ESLT. moving on...


ready%20to%20fire_zps8ycebshc.jpg

Ready to fire. The pump is pushed all the way forward. Because the rod is stationary when the blaster is fired, a better seal is created because nothing is moving through the rubber piston seal. There's no movement to break the seal. When the pump is all the way forward, it opens up the channel in the redirect piece allowing air to flow to the barrel. Much like how a throttle works, really. This piston seal has another benefit: It grips against the rod tightly enough that THE PUMP DOESN'T SLIDE AROUND when the blaster is primed. This is the only pumpaction homemade that I know of with this feature, meaning this blaster can be fired safely, without damage, with one hand, so long as the pump is already all the way forward. You can run with the thing one-handed and not have to worry about the pump sliding back.


To fire the blaster, the trigger is connected to a nylon rod which pushes down on the rhinocerous catch. When the catch drops, the piston slams forward and we all are happy that the experimental blaster actually works. Now onto the real thing...
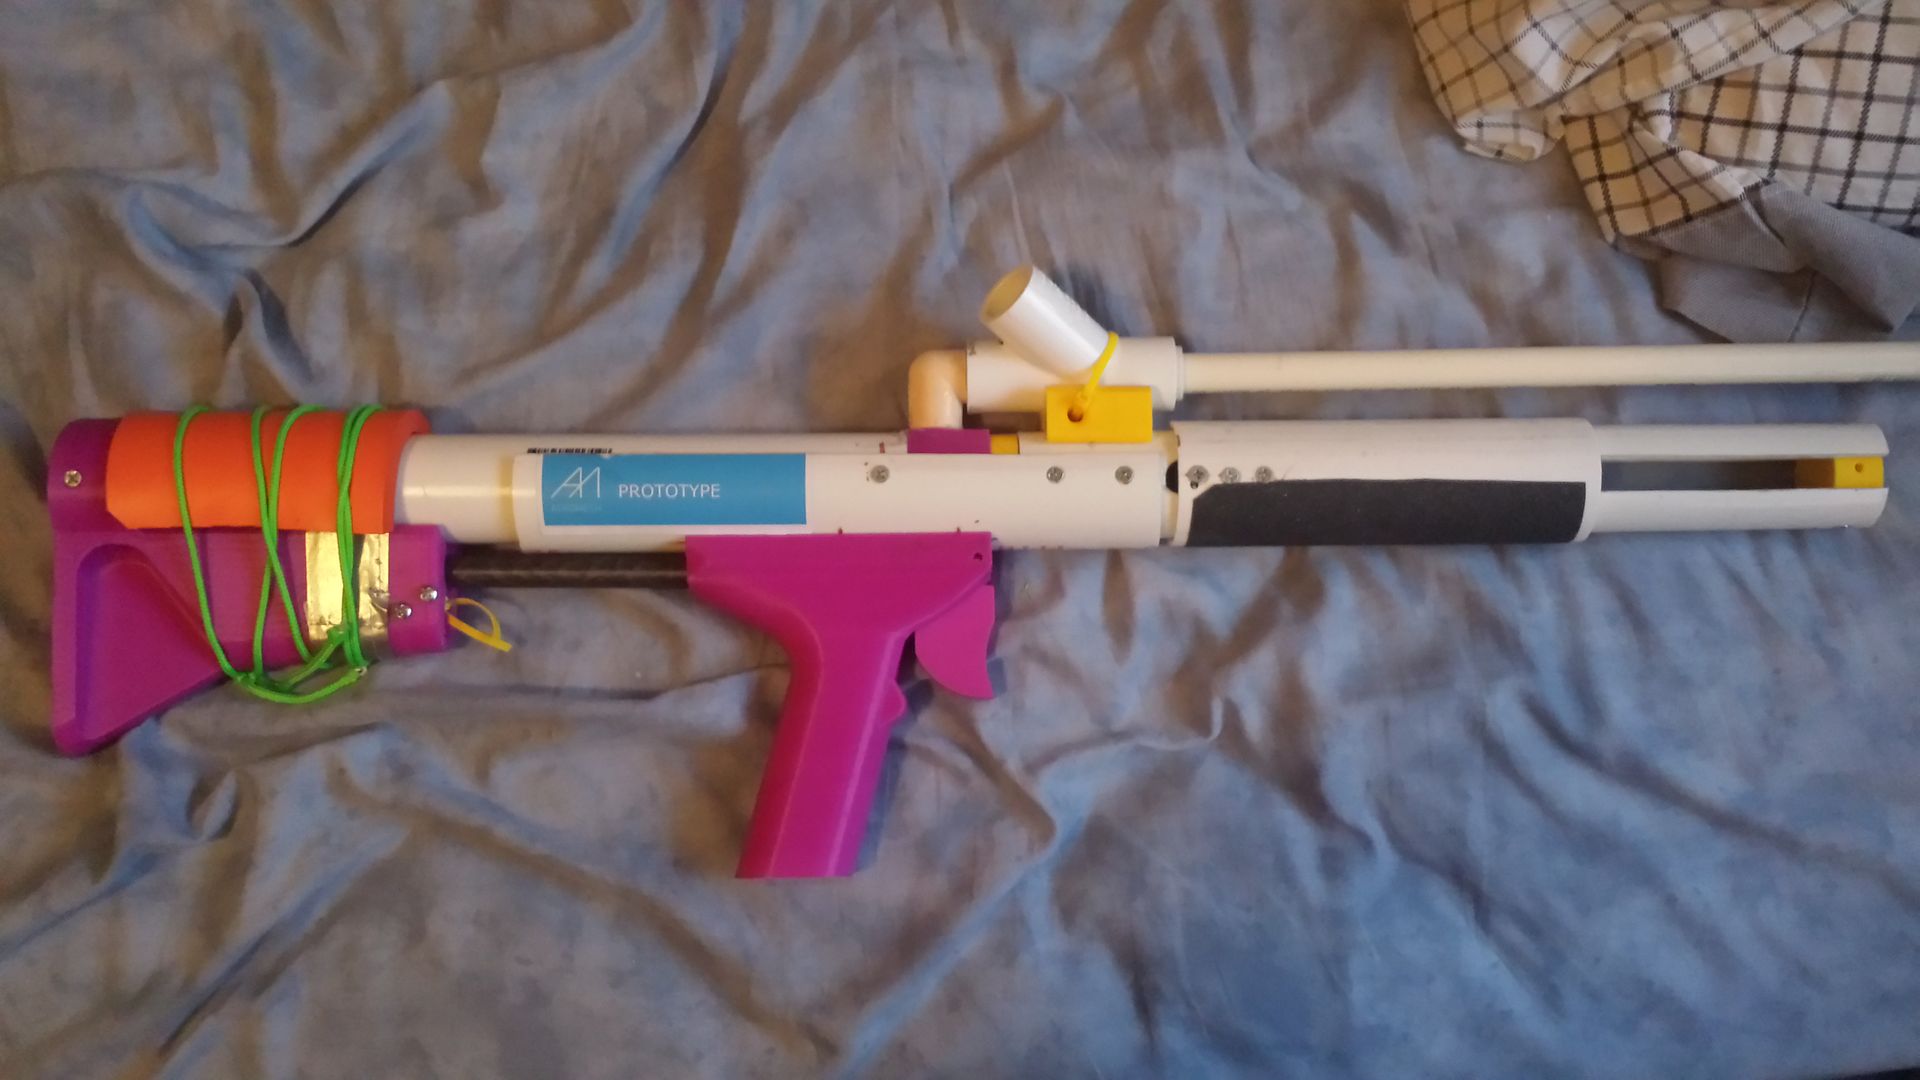
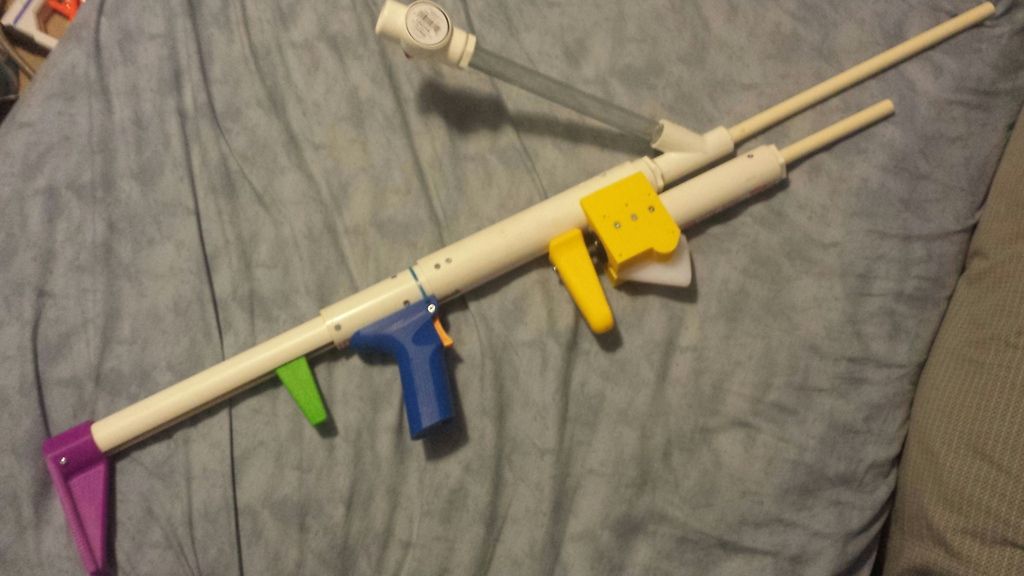


IMG_20151228_171236_zpsok5zuyqk.jpg

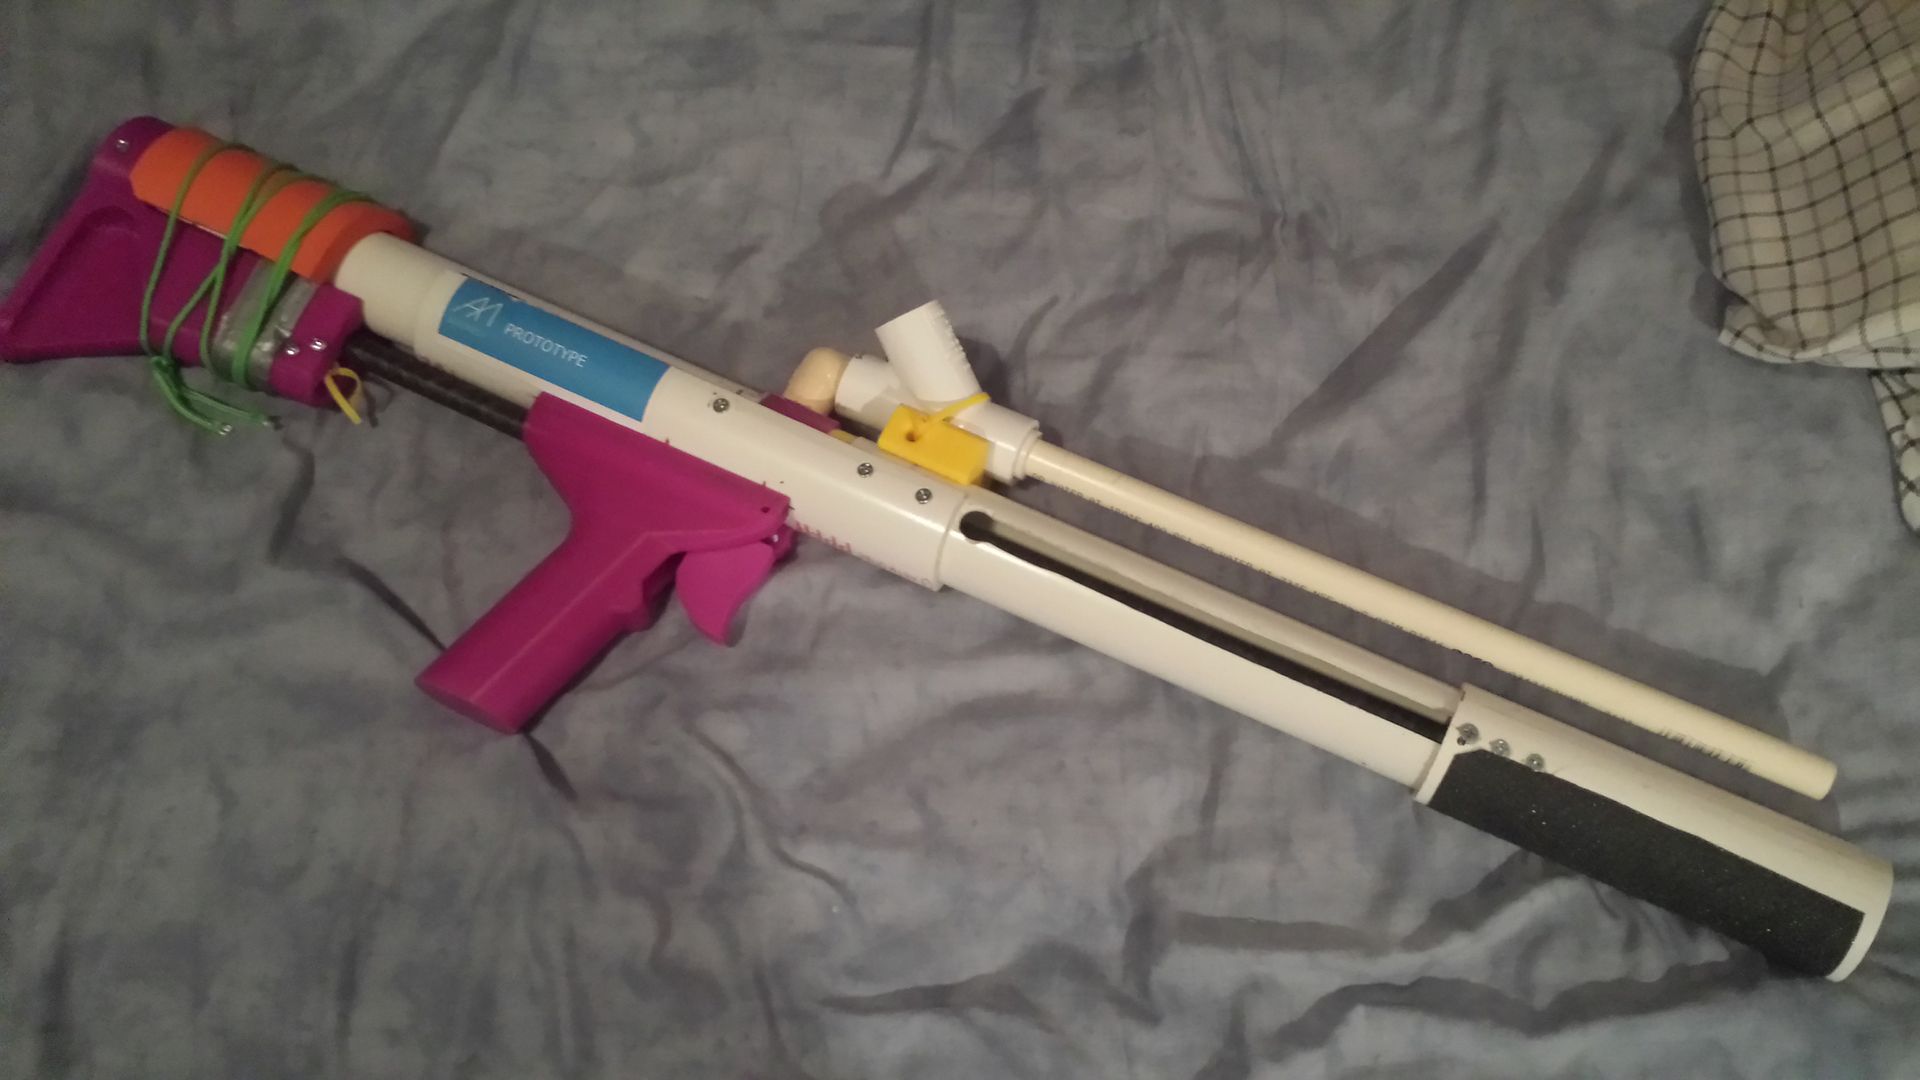
She's beautiful, ain't she?
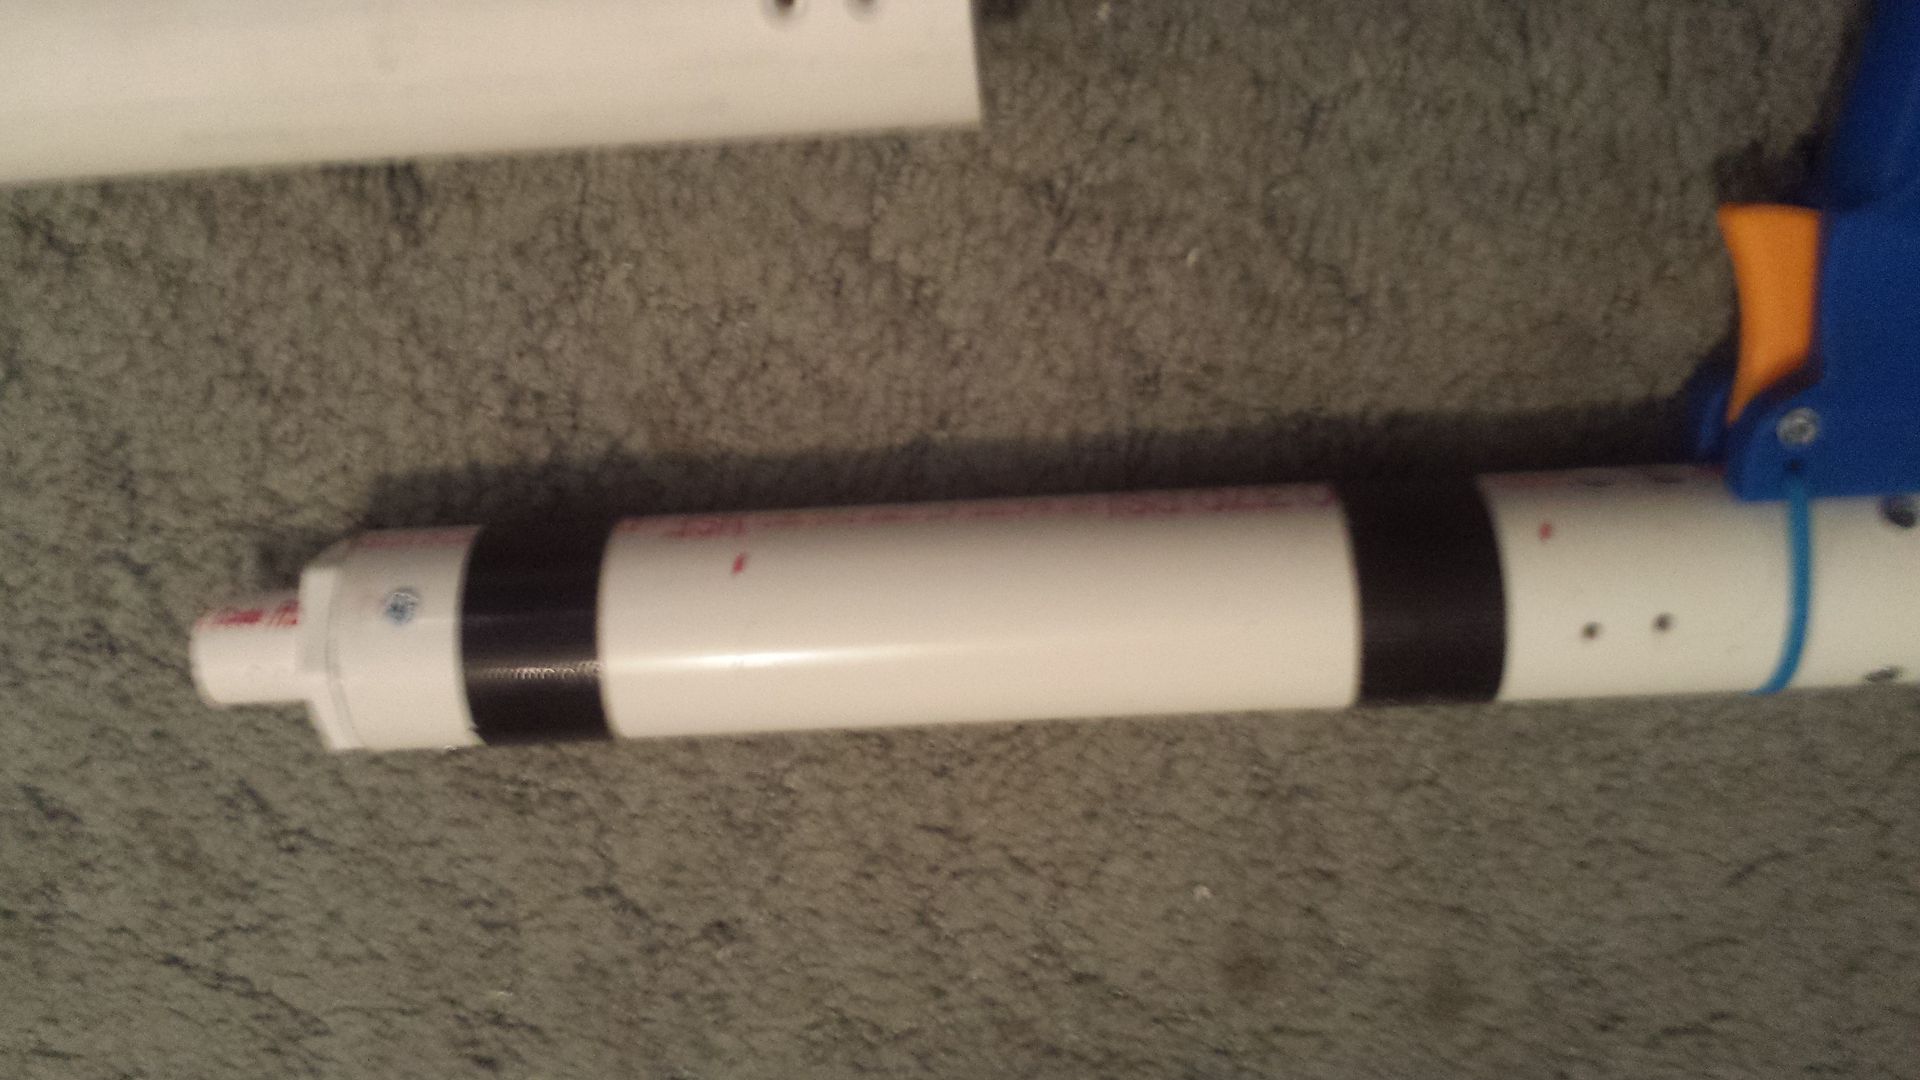


eslt_zpsydx18fmg.jpg

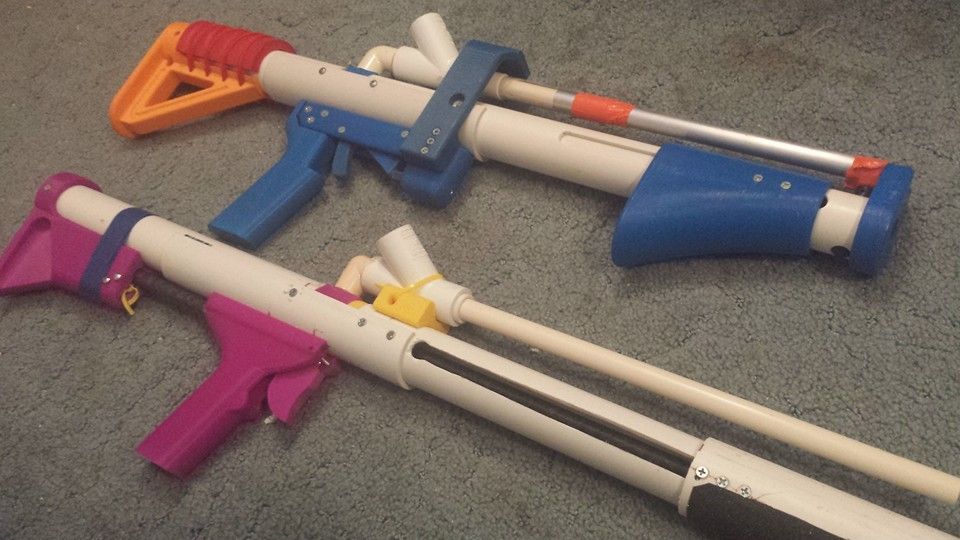
Shitty size comparison. This was for instagram, so it's not perfectly straight, but you get the idea ; )
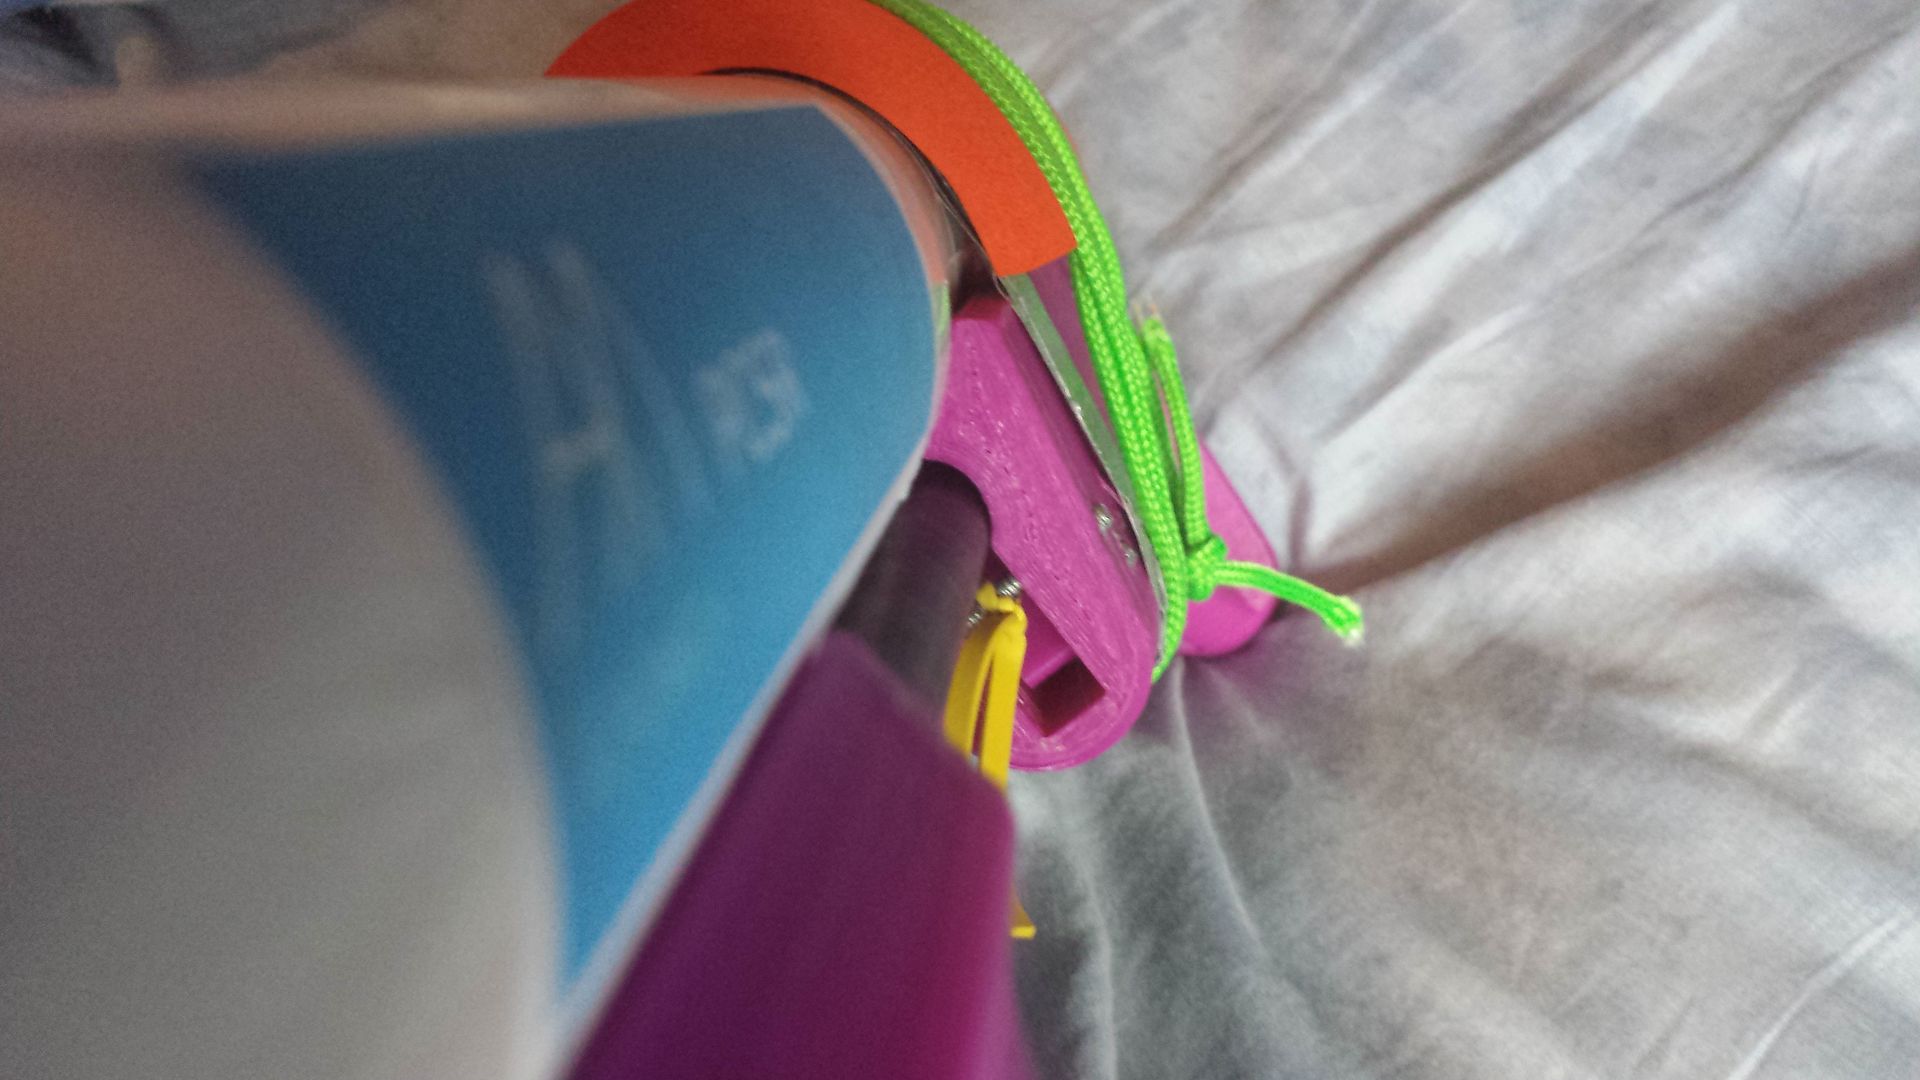


20151228_145010_zpskbbuddxy.jpg

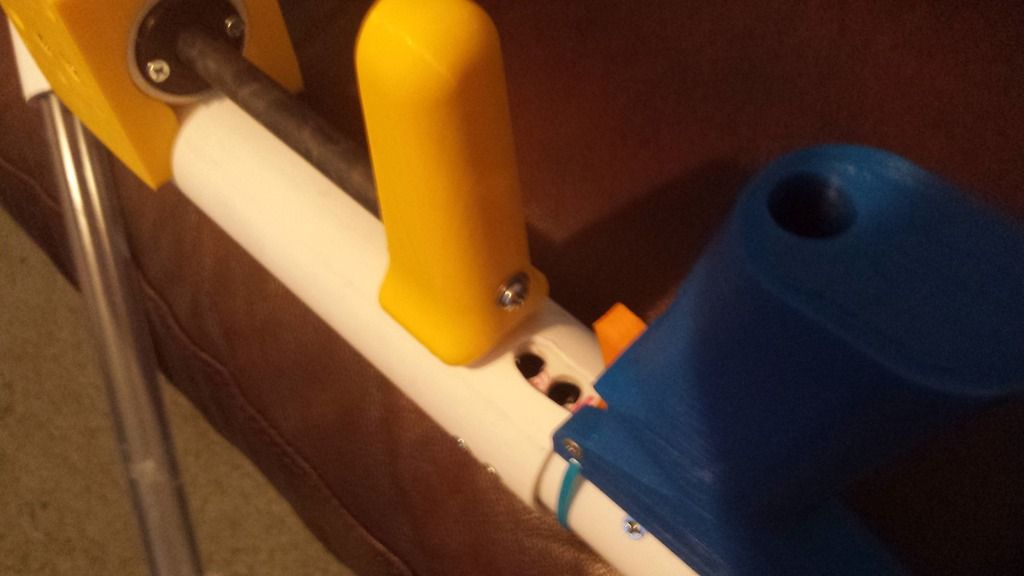
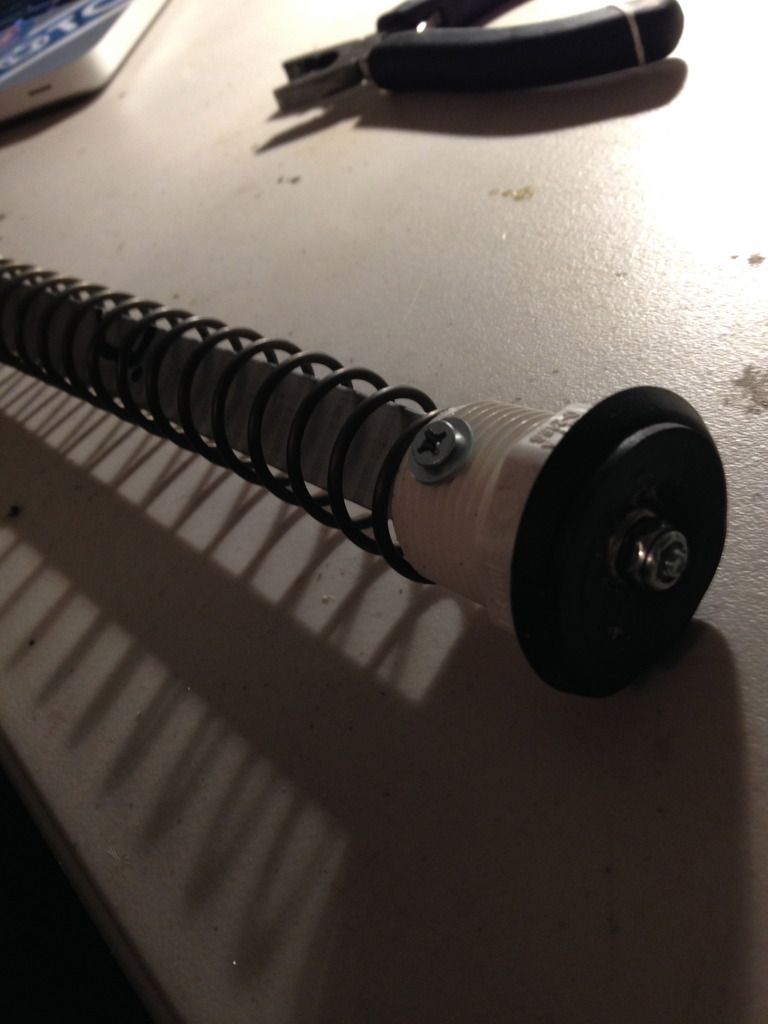
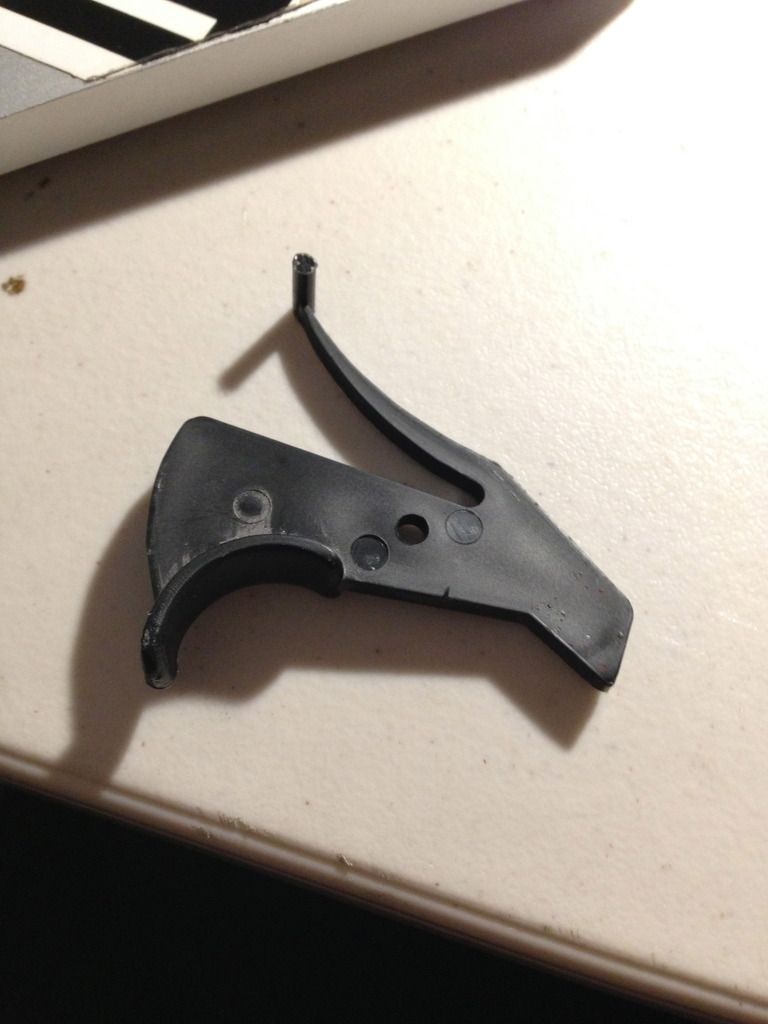
Here you can see the catch in the back of the stock.
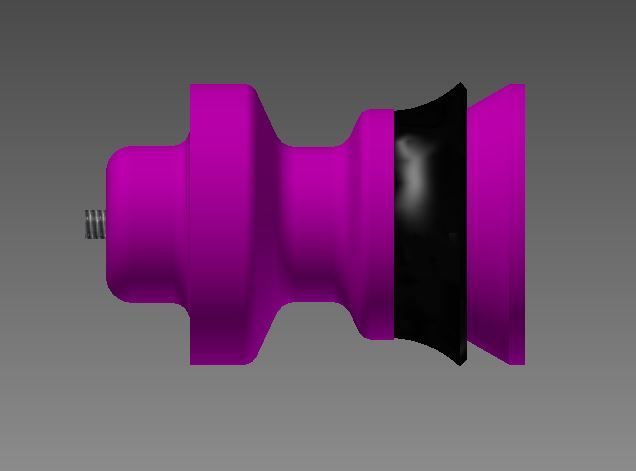
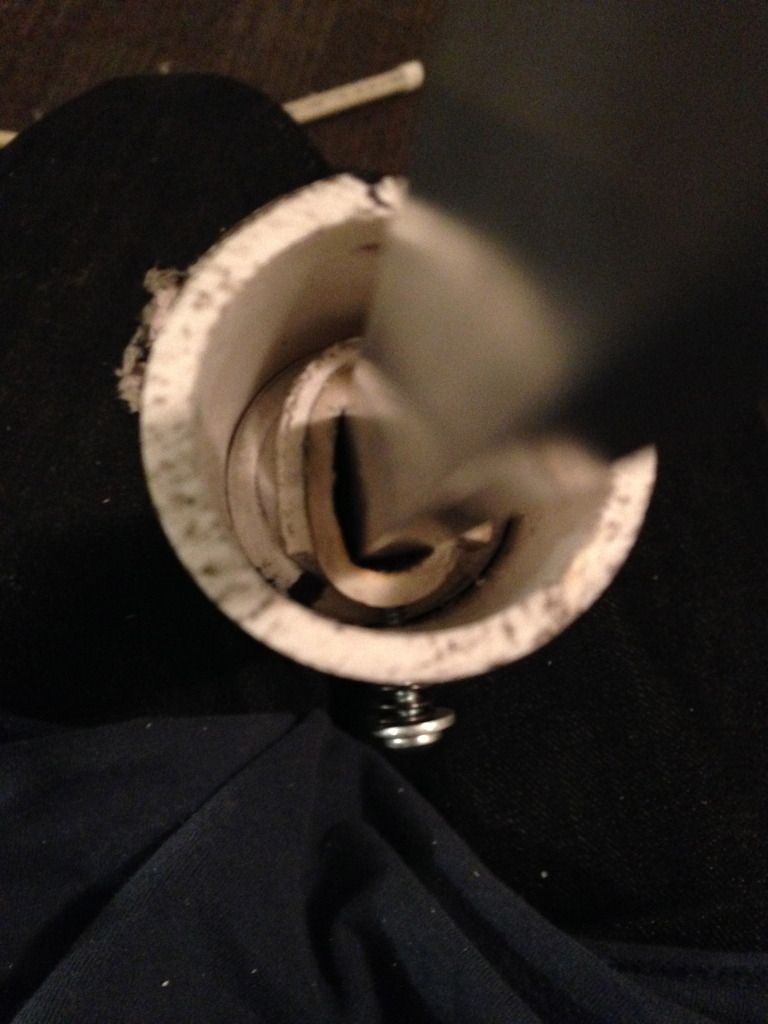
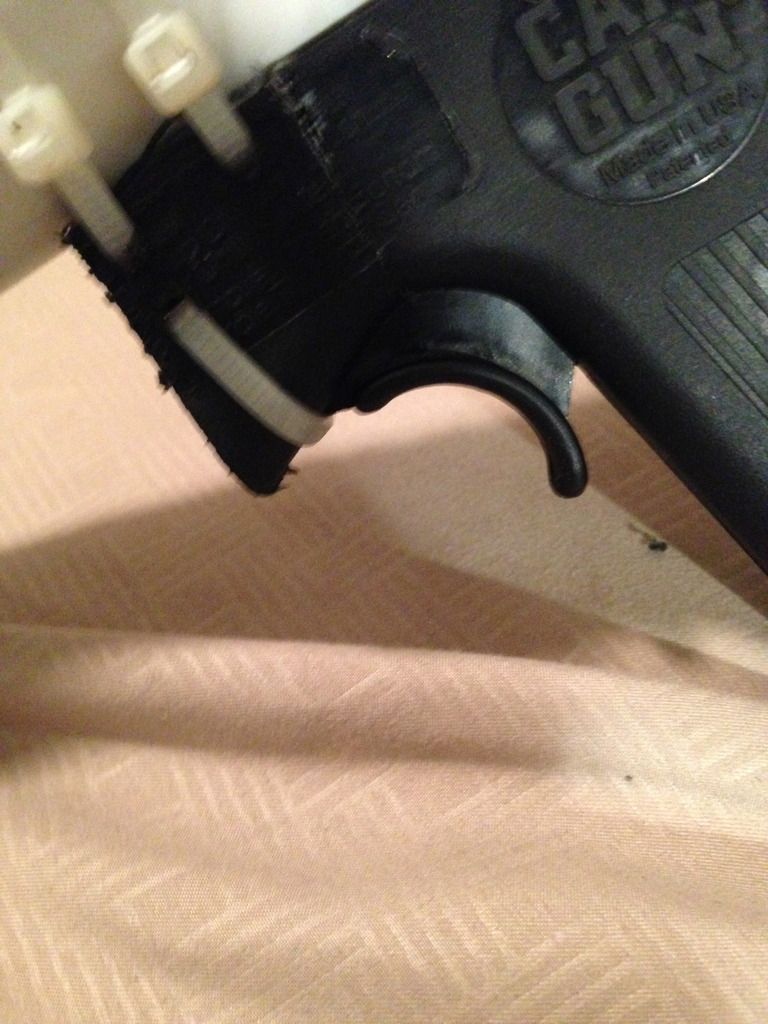


piston_zpshvbmgylh.jpg

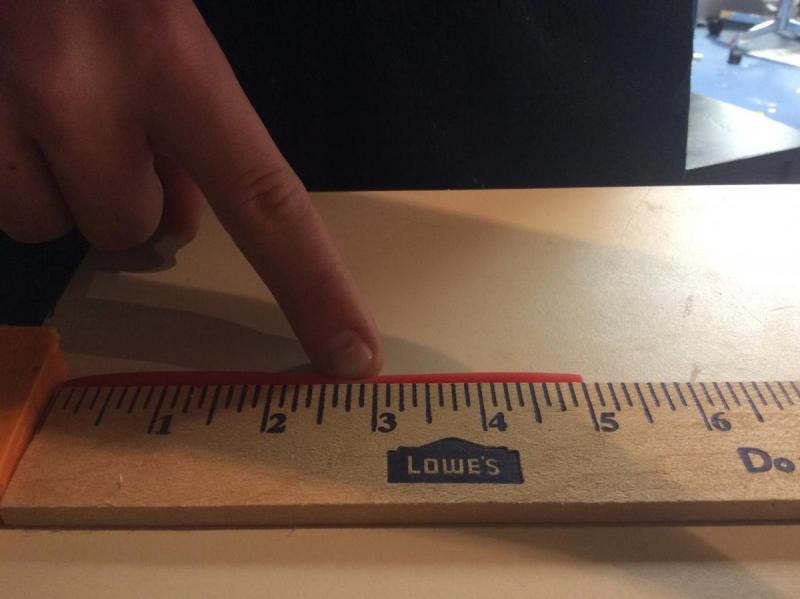
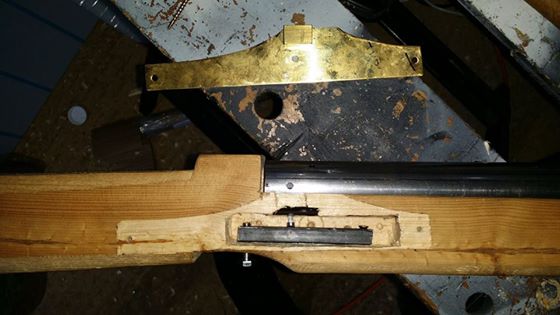
Modified the piston from an o-ring to a skirt seal piston, because initially it wasn't sealing. If this exercise has taught me anything it's that O-rings are utter shit.
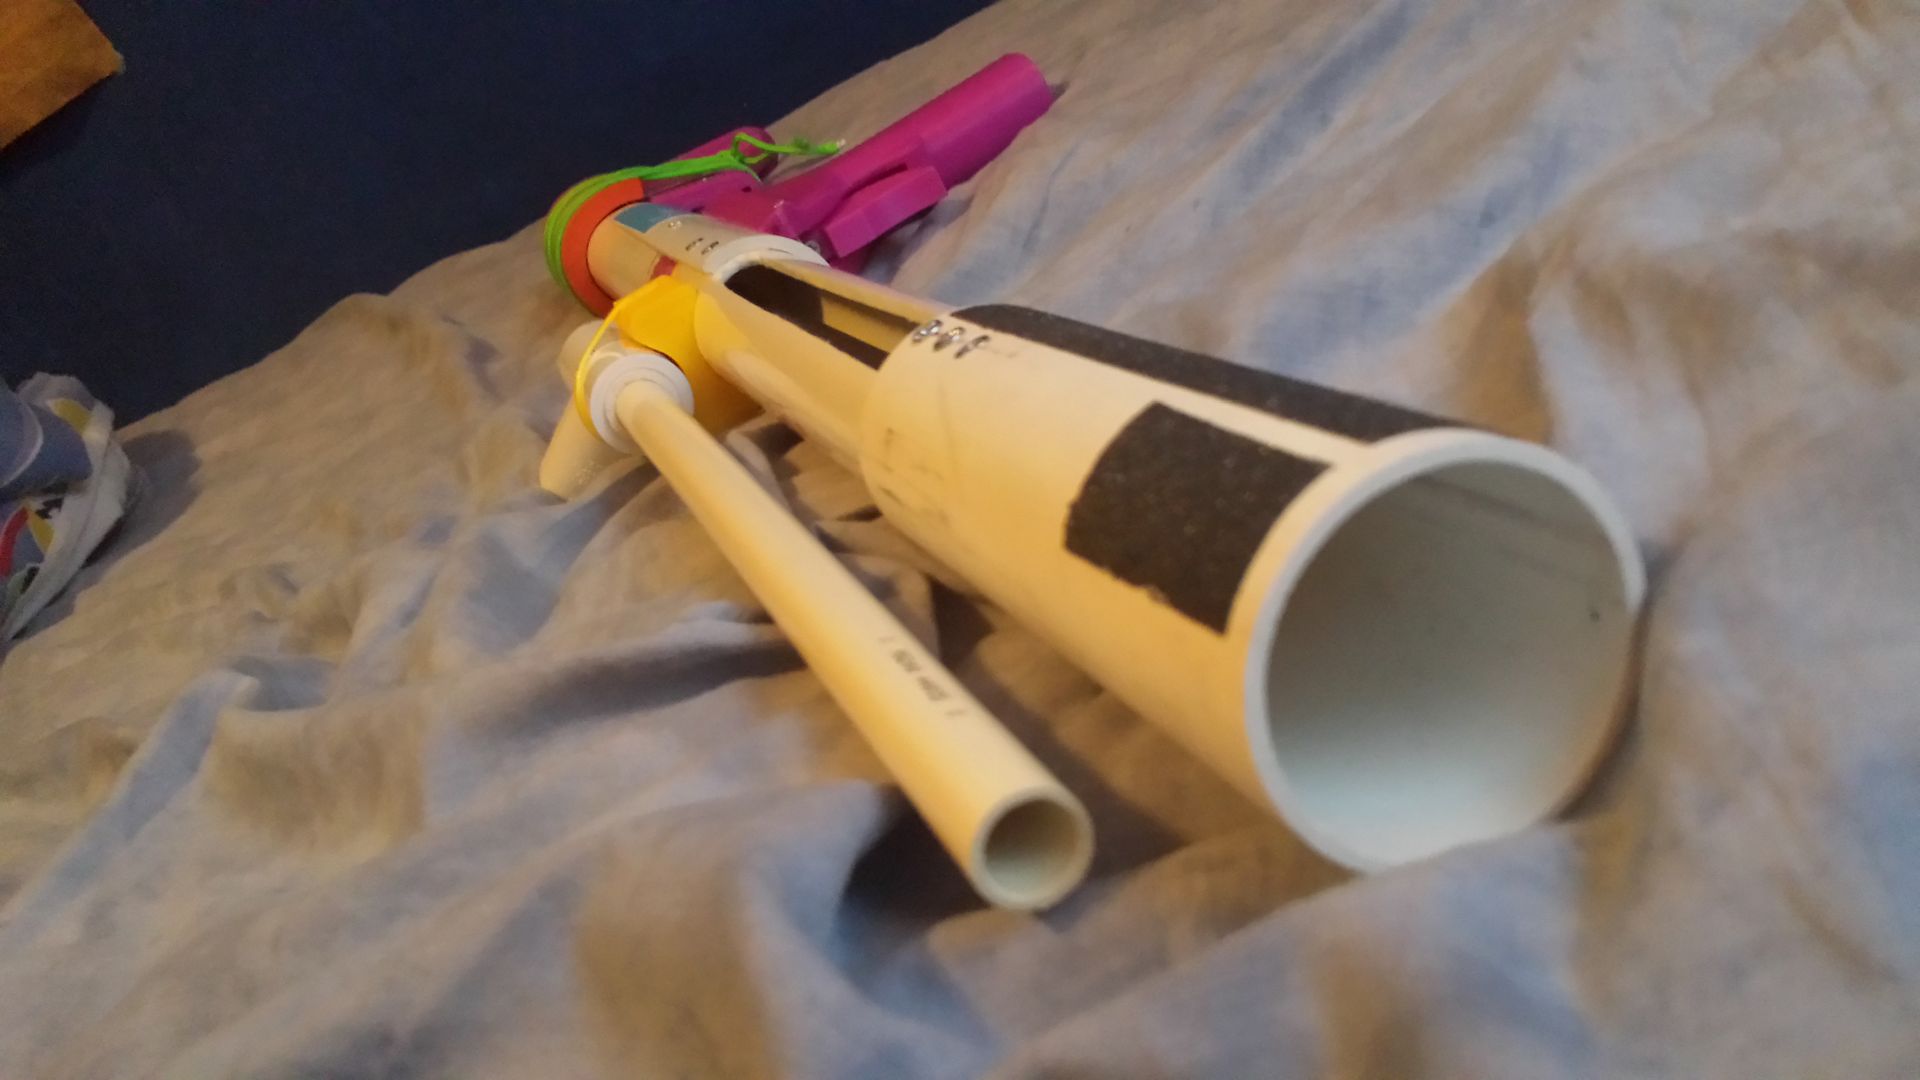
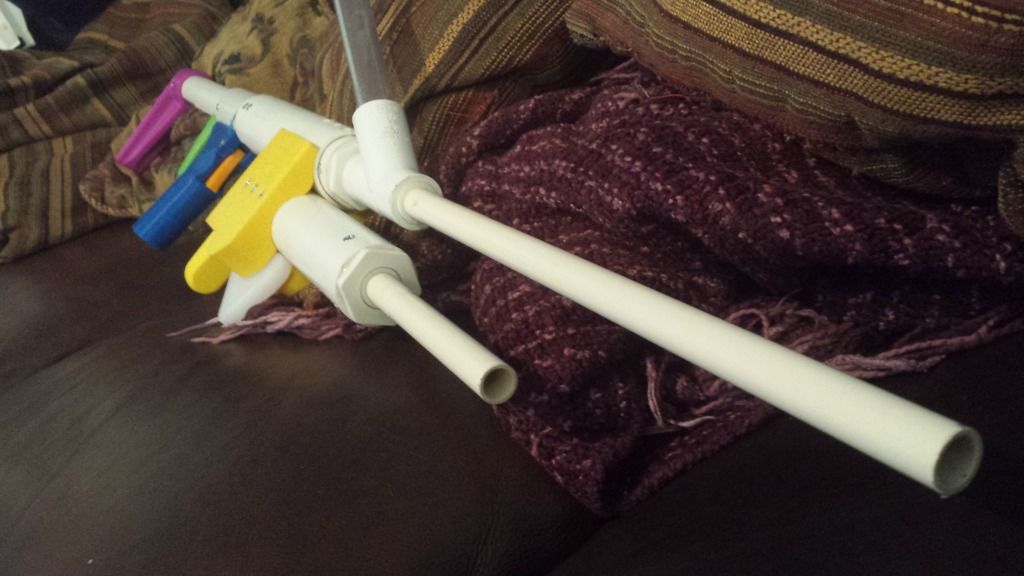
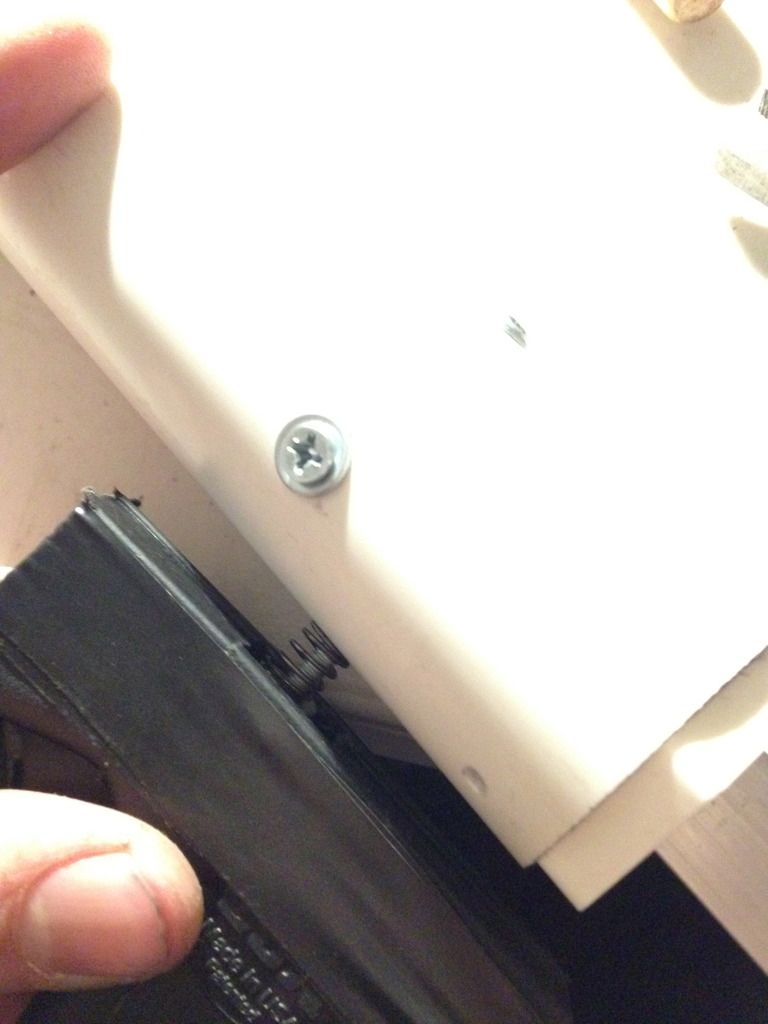


20151228_162254_zpsp5f3az4v.jpg

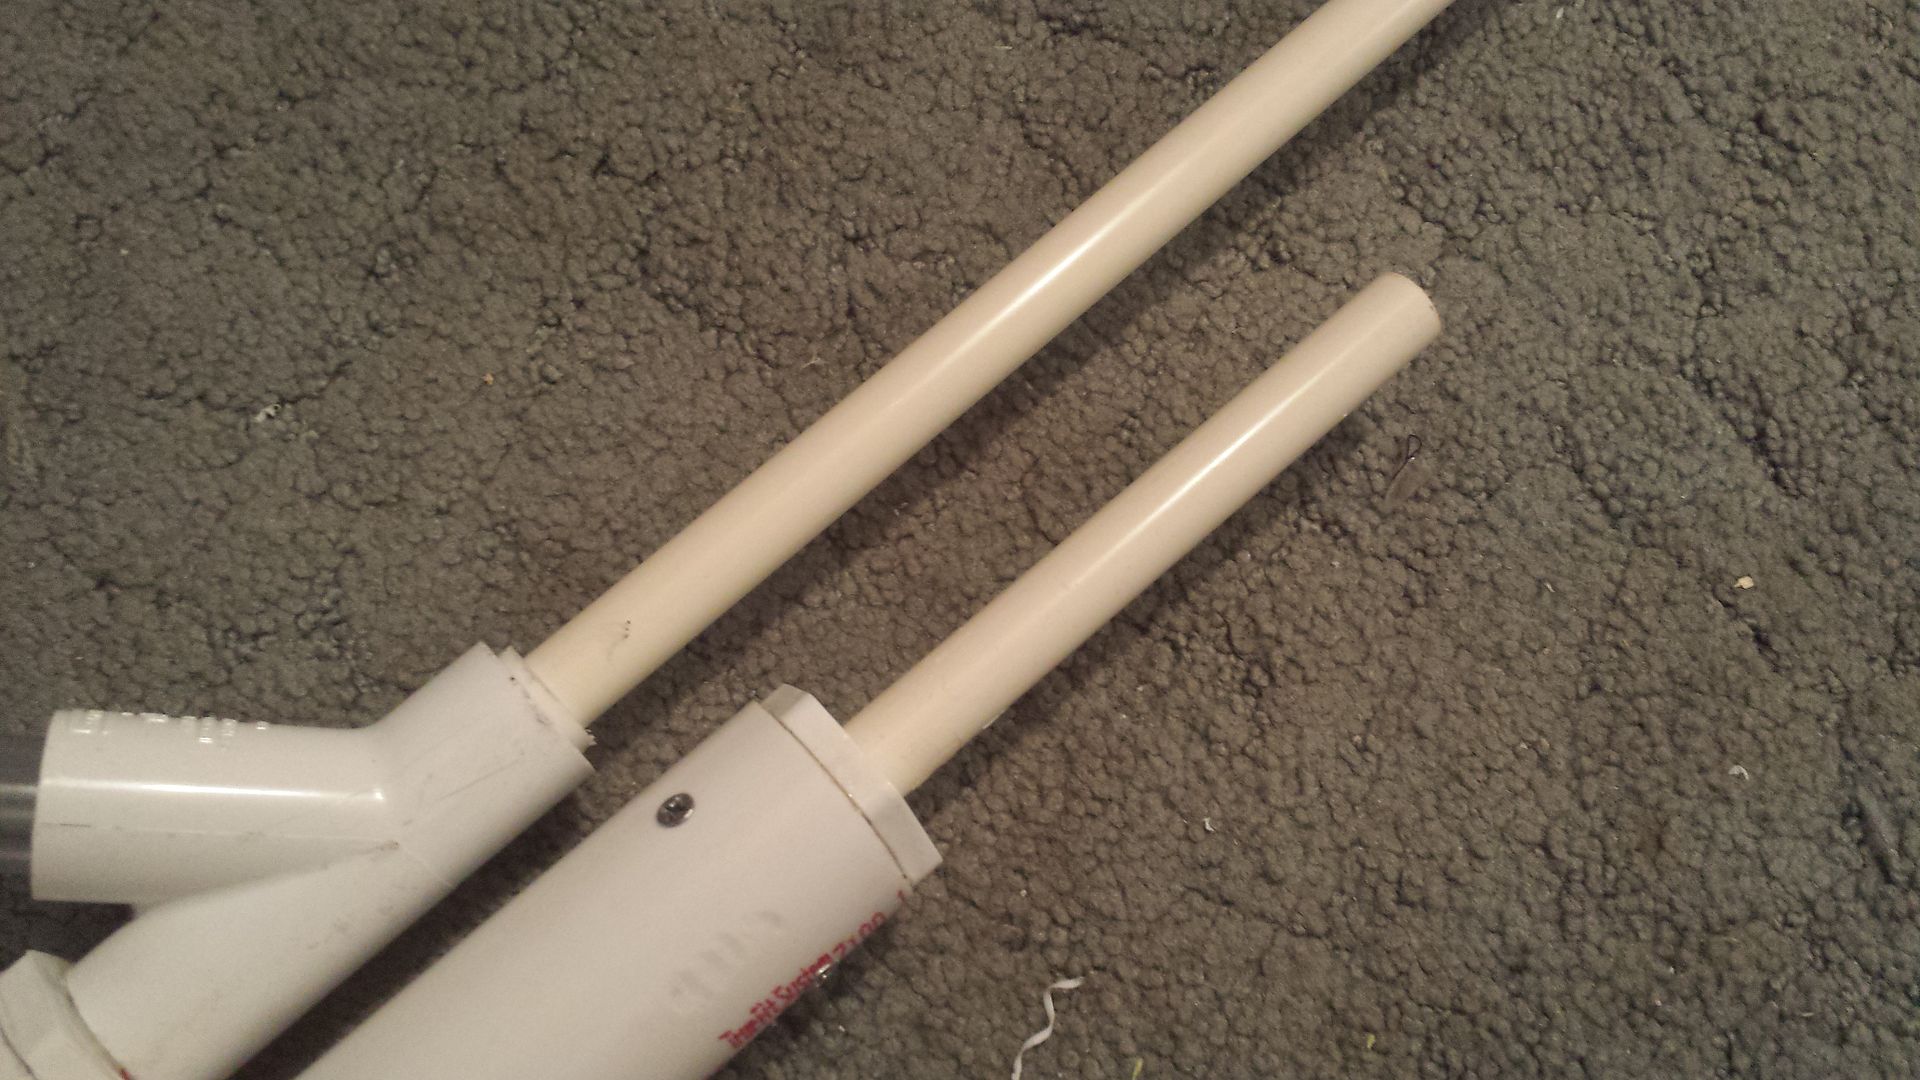
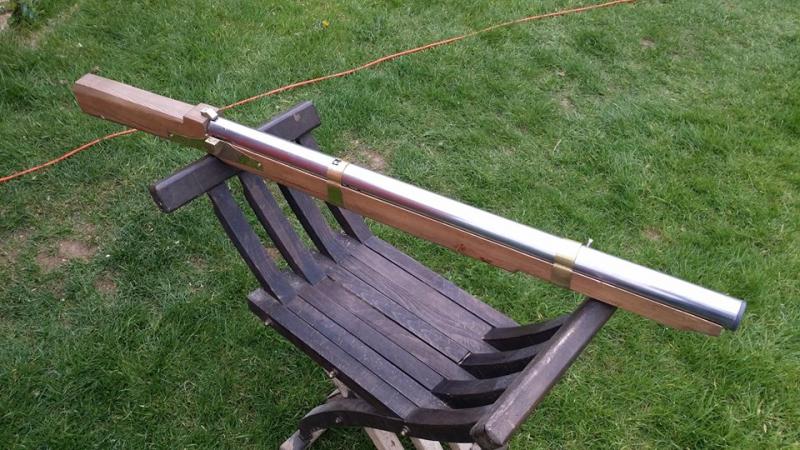
Primed back. The draw is longer than a traditional blaster because it has to overcome the extra distance from the redirect piece, but it's something you get used to. Overall length is 3 inches longer than an ESLT, but that's only because of the length of the pump. Could easily be made shorter, but I like my pumps long.
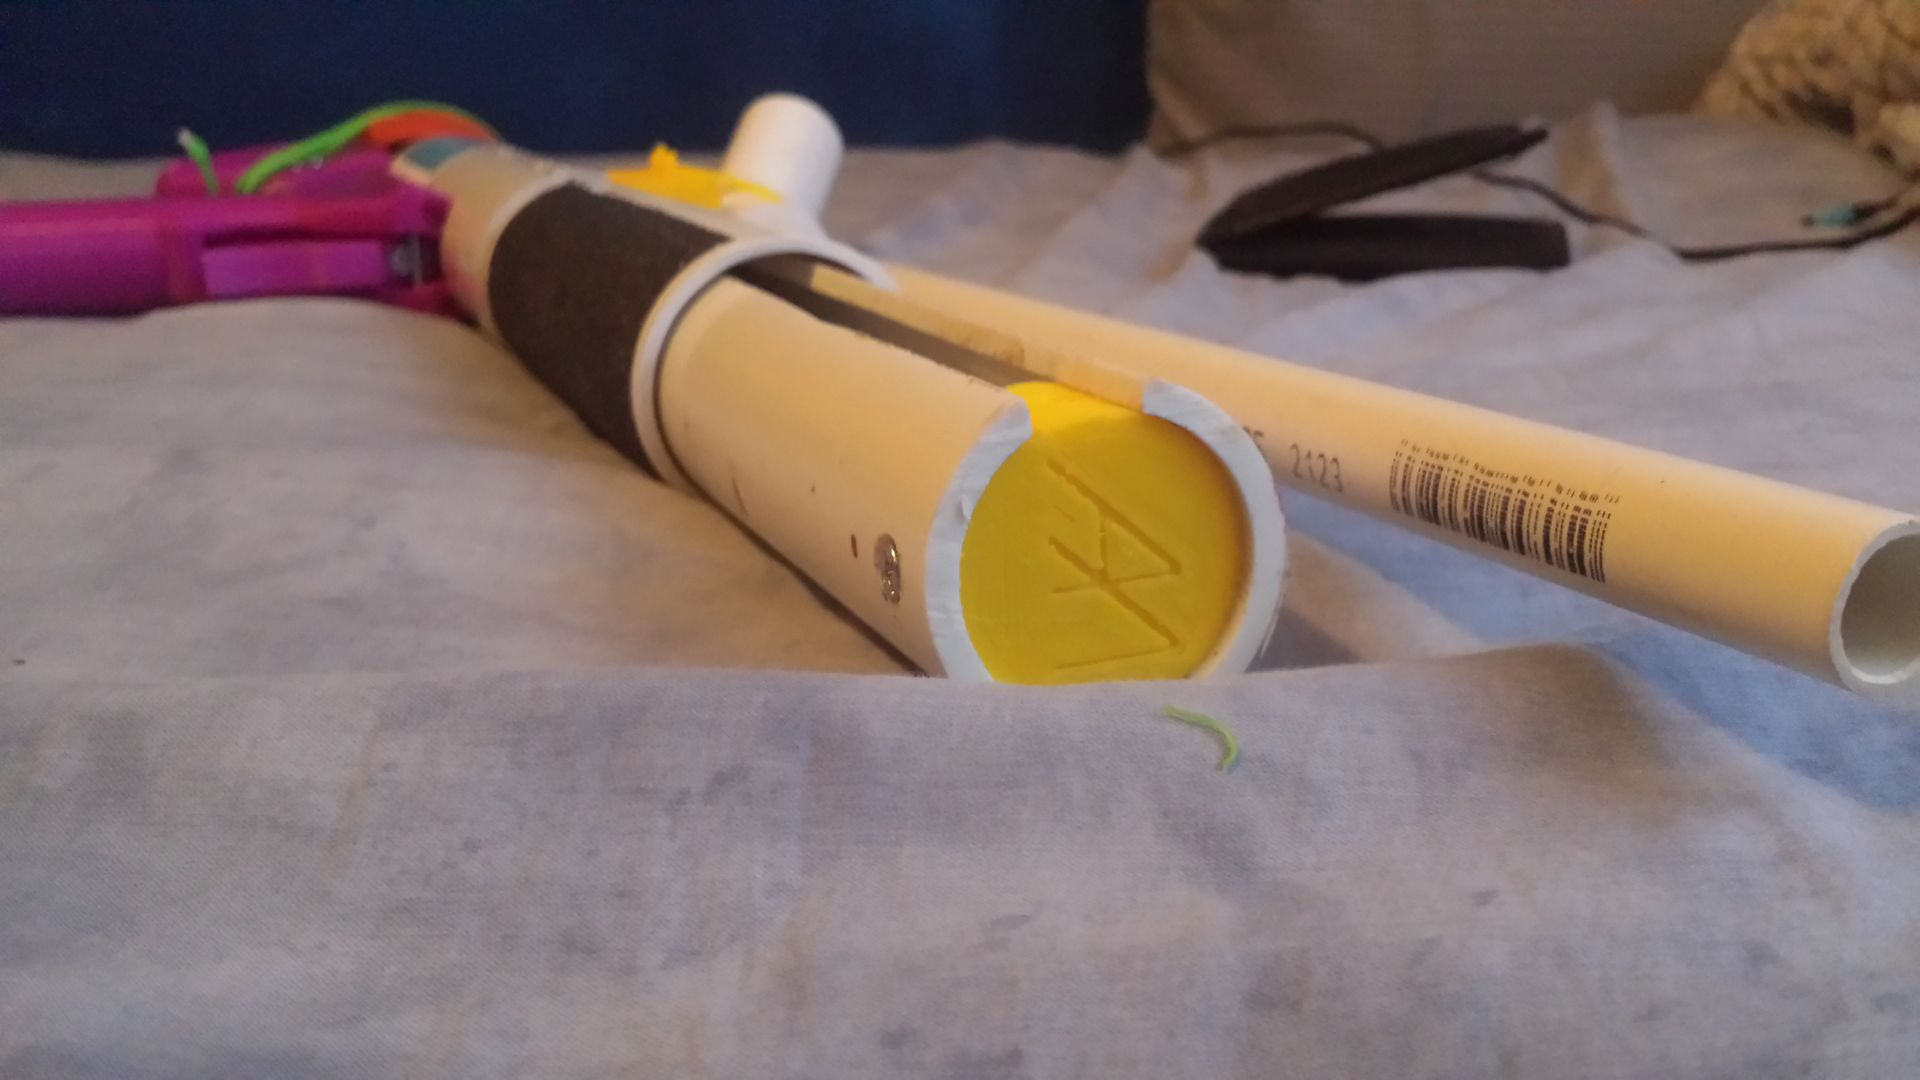
 

20151228_162347_zpskclwihe1.jpg

She's fucking gorgeous and this is only the prototype. I should have another (production model) ready for Frozen Foam on Saturday. In Summary:


-Half a pound lighter than an ESLT

-4 inches longer than an ESLT in current configuration. Much shorter than even a Double rainbow when barrel length is included

-Roughly 220 FPS with a K25 (untested but sound/echoes in my hallway match roughly 220 FPS)

-8 inch pump draw

-Pump stays forward when primed due to friction from pump-rod seal, a feature unseen in any other homemade.

-Roughly 6.5 inches of spring compression with .75 inches of pre-compression.

-Uses commonly available springs for propulsion and only one "specialty" part (the rod seal, but it's $5 for 5 on McM, so it won't kill ya).

-Certainly not 100% seal, but better than an ESLT

-Can change a barrel as easily as any traditional homemade.

-Pump comes out with two screws only, allowing for fast lubrication of the pump rod.

-Spring removes with two screws only (production model won't use duct tape, and will instead use zip ties or an extra ring on the stock to hold in place.)

-Pretty comfy, yo (not quantitative, but hey it just feels good).

-Uses only 10 3D printed parts.

-Still needs slots to be made, but hey ya can't win 'em all.


This blaster has met every goal I've set for it and then some. It gets Double rainbow performance at close to the size of an ESLT, at 15% lighter weight. Adding a little bit of a pump-grip to the thinwall PVC will probably negate that weight difference, but for me, I like the AR-15 cylindrical pumps so long as they have traction, i.e. I am a filthy skater and have skateboard tape laying around. I think I found myself a new primary.


20151228_162458_zps7ivixcdp.jpg

And just in case you were wondering, yes I have a HUGE ego.


-Aeromech

Why Aren't There Homemade Kits?

$
0
0
Why isn't there homemade kits where you get the materials instructions for like a rainbow or eslt and a few resources to make darts and if there are please tell me the link I know of the crazy ghost but they are all sold out ;-;

Straight Pistol Blaster, Help!

$
0
0

Hey everyone, very very new here and to nerf modding!


I am a cosplayer in my off time and I am in serious need of some serious nerf modding/homemade advice. I am having the hardest time trying to mod existing nerf guns to fight my needs. I am trying to build a working replica of Ember Celica (From RWBY) that will fire a single dart. Hand loaded through the front like a traditional pistol/blaster.


The issue I am having is that I need to build the pistol INTO the gauntlet, here is a reference: http://vignette3.wikia.nocookie.net/rwby/images/8/8d/EmberCelicaBadge.png/revision/latest?cb=20131016012713


I tried using the Nerf N-Strike and while it worked to a certain degree, it was just too bulky. I also tried the Nerf Jolt and cut it up and modded it but I can get the trigger to sit without some serious work.


I need the trigger to be available by the thumb and the cocking mechanism available through the top of the gauntlet. I know it sounds odd, maybe I can scan some of my mock up drawings.


Does anyone have a tutorial on a VERY BASIC spring loaded nerf pistol/gun? I went across the net and only came across some of the bigger guns and blasters or tutorials (mostly on YouTube) that were just not very informative.


I would love some help and advice. I wouldn't mind Skyping if necessary or even helping with a commission. I need to get this done before San Diego Comic Con this year! It will be the first working Ember Celica mod out there and I am really looking forward to making it. The ONLY thing that is holding me back is the design for the straight pistol.


Many thanks!


Double or Single Rainbow ??

$
0
0

Looking to buy 1 , what are the pros and cons of each ??


USER WAS WARNED FOR THIS POST

CLEAN UP YOUR POST QUALITY. ALL OF YOUR POSTS HAVE BEEN TEXT MESSAGE TIER.

Hobbyking Silicon Rubber Tubing

$
0
0

I build model planes as a hobby, and to launch glider I use silicon tubing. The silicon tubing is cheap, stretches well, and has a high draw weight when pre-extended. This is in my opinion a superior alternative to bungees, and a cheap alternative to latex tubing. It comes in two sizes, 6mm and 8mm and cost either 4$ or 7$ for 10 METERS. Need I say more?
image.jpg
6mm tubing:
http://www.hobbyking.com/hobbyking/store/__10329__HobbyKing_174_8482_6mm_Silicon_Rubber_Bungee_Hi_Start_Cord.html

8mm tubing
http://www.hobbyking.com/hobbyking/store/__10609__HobbyKing_174_8mm_Silicon_Rubber_Bungee_Hi_Start_Cord.html

I have only tried the 6mm tubing, but next time I place a Hobbyking order I will definitely buy some 8mm tubing. I conducted a few tests to gauge the properties of the 6mm tubing.

Stretch Distance:
I cut a 6 inch piece, and clamped an inch, leaving the stretchable length to 5 inches. I then stretched it to it's limit, which was as advertised, 30 inches. It stretches at a 6:1 ratio! The pre-extension capabilities because of this ratio are fantastic. See pictures below.
image.jpg
image.jpg
image.jpg
I was unable to stretch it to 30 and take a picture at the same time, but I do in the video.

Stretch Weight:
This was a much less scientific test. I took the same 6 inch piece, clamped an inch, and put it through the center of a ten pound weight. It still had a little bit of stretch left in it. Super scientific. See photo.
image.jpg

Practical test:
Next I decided to overpower my beater Snapbow. It has performed very well with three lengths stretched to 4.5 times their original length. It had an easy, smooth prime, and was still penetrating cardboard with stock darts out of a four dart RSCB. I put on two more lengths, stretched to a full 5.5 times their original length. The prime was almost impossible, but as you will see in the video the power was insane. It shot invisibly fast out of an empty RSCB with stock darts. See video. After 5 shots however, I managed to break my catch. (EDIT: I managed to strip the plunger head wing nut) With pre-extension it is easy to get lots of power.

Conclusion:
Watch the video to see for yourself, but in my opinion HKTS is a fantastic alternative to standard latex tubing, both in price and power, especially the former. I will order some 8mm tonight, I expect it to have about twice the power of the 6mm tubing.

Parasite Blaster/Mounting Technique

$
0
0

Preface:


20160124_020340_zps2gfs9rwo.jpg

The humble pullback, lightweight and balanced. But what if you wanted to fuck with that completely? What if you wanted to add a grip to the front or an underslung blaster of some sort? Because drilling into the plunger tube isn't possible, the solution hitherto was to dump a fuckload of hot glue on there and pray the grip/ nitefinder pistol didn't shear off mid-war. Come on guys, we're better than this.


20160124_020226_zpszafc1hje.jpg

Heheh


This post hopes to provide the abstract for an easy solution to mounting foregrips and underslungs to pullback/bow style tubular blasters such as rainbows and snap-bows. This is gonna be a short one.


Materials

~12" thinwall 1-1/2" PVC -OR- 1-1/2 PVC halfpipe a la ESLT (thanks MHA and blitz)

Cutting Board

Tape

Foregrip or blaster you intend to mount

#6 flat-head screws of various sizes (depending on the building materials you have available)


Tools

Saw

Drill with various bits

Long shank countersink

Long nose screwdriver


Let's hit this like a sack of bricks


20160124_020425_zpskqhjqv09.jpg

This is the parasite mounting system and pistol. It's a Rainbow pistol without a grip, and instead with two sideplates and an over-sized trigger, made of cutting board in this picture. The sideplates connect on the top to the thinwall PVC via screws sunk internally from the top into the sideplates themselves, evidenced by the three assembly holes an the top-front of the thinwall.


20160124_020438_zpsn23td4j3.jpg

The thinwall will rest against whatever handle you have on the blaster, so it is fairly stable. Now we just need to attach it...


20160124_020501_zpsntoc9e57.jpg

The only modification needed to the blaster is a couple of screw holes on each side, and a few wraps of E-tape to bridge the Diameter gap between the thinwall and the 1-1/4" plungertube PVC, which is pretty small to begin with. Then the whole assembly slides right on from the front!


20160124_020627_zps3f6rqpn7.jpg

The pullback bar in resting position. It's actually rather comfortable to prime, the space is just big enough for your fingers and actually pretty intuitive when you use it.


20160124_020649_zpsn2yj5jot.jpg

Parasite Pistol Primed. Plenty of room for fingers. You don't notice it at all. Also note the positioning of the pistol trigger, you actuate it with your palm, not your index finger. Takes some getting used to.


20160124_021228_zpsjxs49mdt.jpg

Very easy to cut out a small slot for your anti-vacuum holes. Also note the pullbar matches the curvature of the thinwall PVC, so this is actually a unidirectional catch! (an advantage, in my book)


Results


20160124_030213_zps2atyriub_edit_1453622


--The blaster, originally weighing in at 2 pounds with barrel and hopper, now weighs 3 pounds, 9 ounces. So this particular configuration adds ~1.5 pounds to your setup. Could shave off maybe an ounce by adding lightening holes. Also shifts the center of gravity from right at the trigger to about 6 inches AHEAD of the trigger. So it FEELS heavy because the weight's all the way out there hanging off the front. It FEELS cumbersome and strips away the advantage the pullback had, that was mobility, the ability to swing it around because of it's featherweight. Most of the mass comes from the pistol, so if you were just adding a foregrip, this may be a reasonable "mod" for your bow style blaster, and may only add like half a pound. As it stands, it's super solid.


--That's a lot of weight for one shot, so I run this as a SHOTGUN, BABY. Throw like five darts into the pistol and we be gucci, french toast. With half a K26 in the there, it gets great range even shotgunned. My room is maybe 12 yards long, but it hits the wall with a nice spread and a good amount of force. Could also add a shorty barrel and hopper if you are insane and want to add even more weight to the front.


--Forward trigger is a little awkward, I need to re-shape it, but it's 2am and I want to get this up. Actually decently comfortable just to hold, the 1-1/4 inch plunger tube of the pistol is just the right DIA.


--Super easy to remove if you don't like it or want to change it out for a different attachment. Though keep in mind you need a lot of thinwall if you intend to swap out multiple types of underbarrel attachements


--Need to fine-tune the sideplates shape in my 3D files before I get this out to the community. They're currently really blocky but it's a prototype and it actually works fairly well. Can easily increase comfort and maybe shave off a couple ounces. If you make this yourself, cutting board would work just fine for pistol-mounting.


Use this instead of hotglue, it looks horrible. You spent all that time and money making the thing look professional and then you're going to blast that shit all over it? Just... no. Use this. If you don't have the long-shank countersink tool to use on the thinwall, you can VERY CARFEULLY use a drill bit but I DO NOT RECC'D it. Expect to mess up several times. The take-away here is that you can use this thinwall PVC mounting method (which I dub "parasite") to mount your foregrip/ tac rail/ sack of potatoes to the front of pullback style blasters and not look like shit and actually stay on.


20160124_020742_zpsoxgrf3il.jpg

Money shot. Now with extra flailing appendages.


-Aeromech


Springer Shotgun

imperial units

$
0
0

I have been wanting to make a homemade blaster for a really long time and decided to begin.

Almost immediately i came to the point that i failed to understand the sizes of all the parts.

I hope someone is willing to help me out and explain how this works.


link for writeup: nerfhaven.com/forums/topic/20296-snapbow-mk-v-revised/


i´m sorry for my bad english, i am not a native speaker.


please explain this:

homemade.png

Spring into Homemades Writeup Contest

$
0
0

Foreward

The Nerf season is closing in fast, and it's time to get some old blasters tuned up and some new blasters built. For the veterans, it's the same old routine. For the new guys, seeing some of the writeups around the site can be intimidating, and parts acquisition, labor, tools, and cost can all be prohibitive to the new guy without any build confidence yet. This contest is meant to be a fun little backyard engineering project, with blasters that can be completed in a few hours from locally available parts, and detailed writeups to go through the steps taken for these new blasters. Cost, machinery, time, and labor are all to be minimized to appeal to the new builder, or the seasoned vet that needs a quick and dirty backup blaster.


Design Goals

1) Minimize the use of specialty parts: Most parts should be able to be picked up locally.*                                                                                 

2) Minimize the use of special machinery: Assume your noob audience doesn't have bench tools like a scrollsaw or belt sander.

3) Minimize the overall build time: If it takes several days to complete, you're doing it wrong.                                                         

4) Eliminate the use of 3D Printed parts: Most people don't have one, and any print time IS considered part of build time.             

5) Minimize Cost: Blasters should be less expensive to warrant easier entry into the NIC war community                                   

6) Durability: Blaster should hold up to the abuses of an NIC war.                                                                                                  

7) Efficacy: Blaster should be competitive compared to other NIC type primary arm, and safe to use.                                           


All design goals are worth roughly the same value in terms of scoring. Additionally, it is a contest, so it will be competitive. If guy A's blaster costs $50 and guy B's costs $30, guess who's going to get placed higher up in that category.


grid_zpsnpa1zqfh.jpg

This illustration give an EXAMPLE of how judging will be done, (yes there are more categories, but this is just an EXAMPLE). Blaster B got first in durability, but only second place in cost and build time. But it still had the best OVERALL composite score compared to the blasters it was competing with. The idea is to make an optimized design. If you need to go over a little on price or build time, you're OK so long as everything else is kept to a minimum. That being said if your design is UNSAFE (see rules) its an automatic DQ.


*Most springs will have to be ordered online. The Spring database is a good resource: http://nerfhaven.com/forums/topic/21855-the-nic-spring-database/

 If you find a usable spring in a local store, please post it in your writeup for mucho brownie points.


Writeup Requirements

Address the design goals stated above. You will need to provide a simple list of the items bought to make the blaster, as well as where you got them and the cost of each item. Write the cost of the entire item, even if it's something that you only use a portion of (if you only need 1 square inch of plywood, which costs maybe 5 cents per square inch, you still had to buy the entire sheet of plywood for $8 to get that little piece). If the item is already cut up, estimate the price to the best of your ability. Google is a powerful tool. Include the estimated time it took to build the blaster; you can leave out adhesive drying times assuming it has 12 hours to cure if built the night before a war. Writeup should have detailed photos of each step taken to make the blaster.


The writeup itself should be written in a way that the layperson can understand. Your audience is the guy that is just dipping his toe into the homeamdes realm. Think of it as a Chapter 2 to the homemades contest we had last year.


Rules and Other Things

You are welcome to borrow from existing designs, tweak or update an old one, or make something new entirely. If you posted in the old homemades contest and found some flaws or made some improvements in your SNAP-class blaster, now would be the time to make a Rev 2 build. Just link to older designs and inspirations, and give credit where it is due.


Parts availability is different for everyone, so I'm going to leave it up in the air for this one. If you have access to thinwall or magic PVCs you can use it but be sure to have some kind of alternative material or build method in mind. Just be sure to clearly state where you got everything. Or if you are posting from outside the US, feel free to post components from your local stores. This would be a great opportunity for metric version writeups of popular US blasters.


This is designed primarily for spring type blasters solely because of the dangers associated with homemade high pressure air systems. Airguns are not explicitly banned, but they must be safe to use and build. A PVC pressure chamber blasting darts at 400+FPS would NOT be safe in use, in manufacturing, or even in holding in your hands in my opinion. I'm looking at you, Australia.


Submission Thread Coming Soon

Post writeups there : http://nerfhaven.com/forums/topic/26747-spring-into-homemades-submission-thread/


Judging

A panel of moderators, and various builders from across the country. Please note if you are a judge and submit an entry (as I probably will) you will be eliminated from judging. Posting critiques, constructive criticism on writeups is encouraged, and the author should defend or modify his design decisions based on these. Judging will be based on the design goals stated above, and all will be taken into consideration. All goals are important, we are going to look at every one and assign an overall score.


Prizes

Second Place

          Package of five springs (K25 or K26, your choice) and a 12" x 12" plate of 1/4 polycarbonate. Go nuts.

First Place

          All prizes from second place + A rainbow pistol built and signed by yours truly.


If there are sufficient entries, I will consider adding to the prize packages, or adding another. We'd need at least 7 or 8 for me to consider this.


Deadline is July 1st, 2016


Terms (lovingly ripped from the 2014 homemades contest)
By entering this contest you grant NerfHaven permission to reproduce your submission in other formats and/or on other sites for noncommercial purposes (you will be credited as the author). You grant NerfHaven permission to host images and other resources which are included in your submission. You grant NerfHaven permission to make (mostly minor) changes to your writeup after the contest has concluded and winners have been announced. All contest winners outside of the contiguous 48 states must pay the difference in shipping prizes to their location. All submissions must be written and created by you, the contestant and you must post your submission on this site. You must be an active member in good standing (not banned or suspended) during the contest submission period and judging period.

Spring Into Homemades Submission Thread

$
0
0
ONLY POST SUBMISSIONS LINKS TO THE WRITEUP THREAD HERE.
Do Not post questions, comments or anything other than the LINK to your writeup here.
 
Include the Title of the blaster, and a photo of the completed build in your submission.

 
For Rules and goals, and prizes, see the contest thread : http://nerfhaven.com/forums/topic/26744-spring-into-homemades-writeup-contest/
 
Deadline: July 1st, 2016.
 
Additionally, a member poll will be made available on this page for a people's choice blaster when enough entries are submitted.
 
Best of luck.

P.M.R. - Poor Man's Rainbow

$
0
0

Alrighty, so here goes. 

I'm almost certain there have been many similar renditions to this, but im not sure if I've found anything exactly the same, please correct me if i'm wrong, and if so I apologize. 


This write up is also going to be less-than great, because this entire blaster was made with eyeball lengths and such, and there was alot of trial and error, so again i apologize. 


The catch works basically like a rainbow or R3L style catch, with some different stuff i made up, and the whole blaster is made from stuff i found at my local ace for around 30 dollars or less, aside from the k25 spring but this design can be applied to pretty much any spring length/power within reason. 


I used pretty much basic hand tools aside from a power drill and a heat gun.


You will need:

2 - 1" to 1/2" reducers

1 1/4" PVC

1" PVC

3/4" PVC

1/2" PVC

3/4" threaded pvc plug

1/4" by 1/2" U channel

bunch of different 6-32 screws

E tape

Main spring

strong-ish catch spring sized spring that fits around a 6-32 screw. 

a "CAN-GUN" spray paint sprayer (http://ecx.images-amazon.com/images/I/71fxCGIDrnL._SL1440_.jpg)


Plunger:


Take your U channel and cut it to the length you want your plunger rod to be. a bit longer is probably better because it can always be cut down later. I used somewhere around a foot. 


IMG_3179_zpsovl969fq.jpg


Wrap the end in E tape til the edges fit snug inside the 3/4" threaded cap. I used a threaded cap bc the inner diameter was a bit snugger to the u channel than anything else.


IMG_3181_zpsx7s3tcav.jpg


Screw it on


IMG_3182_zpsxmhs9jwc.jpg


Make a snap style head and screw it on and slide your spring on for now. 


IMG_3195_zpst5hlyps6.jpg


Spring Rest:


I used about a 1/2" length of 3/4" pvc forced inside about an inch of 1" pvc wrapped in a bit of etape so it's centered in the plunger tube. This allowed my k25 to rest on the 3/4"  pvc and the 1" keeps it centered while still have enough room for my u channel plunger rod to freely slide through. 


IMG_3184_zps6i6sm5xa.jpg


Catch ring: 


Take about a 3/8"-1/2" length of 1/2" and 3/4" pvc and make them fit inside of each other. 


IMG_3177_zps5m3cimss.jpg


Heat up this ring, i used a heat gun. stretch it around your u channel so it has as squarish of a shape as possible and slides freely around your u channel. You may have to file the inside a bit once it cools down. 


IMG_3180_zpsdxpphmtp.jpg


I ended up having to cut off the bottom so the catch had more space to fell into the catch notch on the rod. Because the 3/4" ring wasn't as tight without being full i super glued it to the inner ring. I also ended drilling a small hole in the top of the catch and putting a set screw thru both layers of the catch, which i unfortunately don't have a  pic of. 


IMG_3202_zpsgbyxlmlq.jpg


Compress your spring as much as you can with the spring rest over top an mark where your notch for your catch should be and cut. 

IMG_3200_zpsrwqrkzuo.jpg


End cap:


take your 1" - 1/2" reducer. There's a lip on the back side, a tiny sliver of 3/4" pvc and make that lip flat so your catch has a back plate. 


IMG_3186_zpsal5n4a95.jpg


IMG_3187_zps4swi8ts5.jpg


Body:


Take your other reducer and wrap er in tape and super glue/goop/etc to seal it up in you're 1 1/4" plunger tube. put a screw thru for support same as a snap and every other homemade pvc spring. 


IMG_3190_zpssd1lc5sy.jpg


Take your plunger/spring/spring rest/cap and measure out how long your plunger should be.


IMG_3189_zpsljwojz33.jpg


Leave less than a millimeter of space between catch/rest/end cap so the catch can move up and down but not forward/backward. Cut your plunger tube to length, line everything up again, and drill holes for the end cap and spring rest. 


IMG_3201_zpsezhf4enb.jpg


Put your plunger/spring/spring rest in and screw the rest in. slide your catch around the rod and make sure it's flush against the spring rest. Drill an 1/8" hole thru the bottom of the plunger tube and reem it out so your screw can slide freely, and drill an 1/8" hole in the bottom of your catch but do not reem it. take a 6-32" screw, a few washers, and your catch spring and screw into the bottom of your catch like so:
(Note: I ended up using a longer screw and 4 or 5 washers instead of the short screw and 1 washer pictured)


IMG_3203_zpsy0vxq2tj.jpg


Drop your end cap in and screw it on. I found 1 screw is more than enough cause there's not any real pressure on it. 


Handle: 


take your "can-gun" spray paint handle:


IMG_3214_zpslbtyijw0.jpg


Split it apart, pull out the trigger:


IMG_3215_zpsbhuiwkww.jpg


Make it look like this:


IMG_3216_zpsxzacflll.jpg


Take the handle and make it look like this. Don't mind that extra cut in the middle i screwed up and ended up having to glue it back together, no fun. 
IMG_3217_zpsmmhv9iqg.jpg


Cut a square in the top:


IMG_3218_zpspki6nwpp.jpg


Screw head/washers/spring should move freely through the hole:


IMG_3219_zpss5pa9zer.jpg


Drill some holes for zipties:


IMG_3221_zpsmjhlvpo2.jpg


Throw some hot glue on top and slap her on and line it up, then tighten zipties,+more hot glue on edges for good measure. 


IMG_3222_zpsmpqmhclp.jpg


This ziptie keep the bottom of that part from splitting under pressure and keeps the trigger from swinging to far forward. 


IMG_3223_zpsq3bl0cea.jpg


Wrapped the handle in E tape to stiffen it up a bit. would probably benefit from being filled with hot glue, resin, epoxy putty, etc, but I didn't do any of that and its still plenty sturdy, I just think it would feel a little nicer filled. Drill an 1/8" hole through the end of the plunger rod, reem it a wee bit, and put a 6-32 screw with some washers on it and a nut on the end for a handle to pull back. 


IMG_3224_zpsnmd7bkgu.jpg


In conclusion im pretty satisfied. It works flawlessly so far and was cheap and relatively easy to make in a few hours. 


I will likely be posting revisions/additions as i make them/fool around a bit more, as i just came up with this like 2 days ago and made it today. 


Let me know what u guys think, good or bad, or if this has been done, etc. 


Thanks

~Holter

Yang Ember Celica Nerf Gun! (RWBY Cosplay)

$
0
0

I thought I would share this with everyone here. I am really excited for these and I am really happy with how they came out! I will be Cosplaying Yang from RWBY at Anime Expo and hopefully comic con this year. I am still putting together the entire cosplay/outfit and I am also working on a tutorial for how I made the blaster.


Here it is! Hope you guys like them as much as I do!


The Nerf Blaster I used was the FireStrike Elite for each bracer. I basically striped down each blaster to its core of the plunger and the barrel. I then used a wooden dowel to create a lever style trigger to push up on the pull back catch. This allows me to press down on the dowel and fire the nerf gun.


I also removed the limiter since it was really easy to do and mounted the blasters to the foam directly with hot glue and gorilla tap. The rest is basically cosmetic. I used Gym mat EVA foam for the actual bracers and 3MM EVA foam for some detail parts like the dart holster. Each gauntlet holds 6 darts plus a single in the barrel, for a total of 7 darts.


The pull back is directly behind the rear fins and sits along the inside of the forearm. This allows for a little bit of pull back room to reach and use the pull back.


I am currently working on a full video tutorial and hope to have it up in a week or so!


20160213_120016.jpg


Hopefully this link works =0


Here is a Youtube video of me firing it. Skip towards the end if you don't want to hear me ramble!


https://www.youtube.com/watch?v=Inz0PLR_hfU


Much love, happy hunting!

PMS - Poor Modder's SNAP

$
0
0

Since "Poor Man's Rainbow" was already taken, I had to go with something else, and get a funny name to boot.


Parts List


1 1/4" S40 PVC

1 1/4" S40 PVC Cap

1" x 1/2" S40 PVC Bushing

1/2" CTS CPVC

1/2" CTS CPVC Cap

1/2" CTS CPVC Tee

3/8" PEX Tubing (1/2" OD)

1/2" OD Aluminum Tubing

1" x 1/2" CTS CPVC Bushing

5/8" x 1/2" x 1/2" Nylon Spacer

3/8" x .171" x 1" Nylon Spacer

1" x 1/4" Nylon Washers

1 1/4" x 1/4" Nylon Washers

#10 Pan Head Screws

1 1/4" Rubber Slip Joint Washer

9 1/2" x 11/16" x 0.72" Compression Spring (Hillman #62)

1/2" Diameter, Short Spring


Estimated cost: $30 (When excess material is taken into account, you only need to spend $20 to build an additional two blasters)

Estimated assembly time: Under an hour


Part I: Plunger Construction


Cut 14" of PEX tubing, and use a deburring tool of some sort to clear the inside of any obstructing plastic pieces. Then grab your 3/8" OD nylon spacer, and hammer it inside the PEX.


0325161150.jpg


If you can't get the spacer to go in, ream more plastic from the inside of your PEX. Once you get it started, hammer away until the spacer is flush with the end of the tubing.


0325161359.jpg


For the plunger head, take your nylon washers and glue them together. If you wish, you can take a short piece of 1/4" vinyl tubing and place it in the center to assist in lining up your washers and orienting them on the plunger rod, but it isn't necessary.


0325161155.jpg


To be clear, the 1" washers go between the 1 1/4" washers. If for some reason nylon washers just aren't available in your area, you can use fender washers of the same size.


Take a #10 screw (3/4" to 1" long) and put it through the middle of your washer sandwich. If you used the tubing piece, you'll have to screw it in.


0325161159.jpg


Screw the whole thing into the nylon spacer embedded in your PEX tubing. It will take some strength, as you're using a spacer that's one size too small - this is on purpose. We want the threads to dig into the nylon to keep it secure.


0325161400.jpg


After all that has been done, slide on two 5/8" OD nylon washers from the back of the PEX. When they get to the end with the plunger head, they will be difficult to finish moving. You'll probably need to slide some 1/2" PVC (Sch80 is better) over the plunger rod and use that to hammer the spacers the rest of the way down. Once there, the spacer and tubing sandwich will be tight enough that no fastener or adhesive will be needed.


Slide on the CPVC bushing. If you like, you can remove the end of the fitting to shave some weight. You can leave it there if you like though, especially if you have a beefy spring that can fit inside and would benefit from having a place for the end to sit.


0401161317.jpg


The ridge on the CPVC bushing is close to, but not quite the same as the plunger head diameter. This makes it ideal for use as a catch plate in a SNAP-style blaster.


At this point, you can add the spring. Hold off on adding any spacers behind your spring until the rest of the blaster is complete - it's easier to adapt the plunger to the tube than the other way around.


0328161056.jpg


Part II: Plunger Tube Construction


Cut a 13.5" length of 1 1/4" PVC for your plunger tube. Due to a shortage of parts at the time of prototype construction, I did a few things different than I'm now instructing you to do. Remember that as we look at these pictures. Measurements will be 1.5" or so off of what you will be doing.


0327161436.jpg


Drill a 5/8" diameter about 8.5" from the front of the pipe. Depending on tools available, you can use a drill press (a good investment, even if it's the cheapest model at Harbor Freight you can find) or a power drill. The first is far easier in terms of lining everything up, though. Make sure to take steps up to 5/8", and not try to drill it all at once!


0327161420.jpg


You will need a roughly 2" spacer sitting behind your spring and ahead of your cap/spring rest. The placement is important, because it allows room for proper trigger placement later on.


0327161552.jpg


For the back of your blaster, use a 1 1/4" PVC cap, with a 17/32" hole drilled in the middle.


In my blaster, I ended up throwing a thick, 1 5/8" diameter nylon washer between the pipe and a coupler (didn't have any caps on me), and then drilling some 11/64" holes for the #10 screws.


0401161413.jpg


Also, I didn't have any shorter screws available at the time. You should use 1/2" long screws


0401161417.jpg


Finally, after putting your cap/end setup over the plunger rod, you should put a small stub of CPVC in the middle leg of your tee. Throw it onto the end of the rod and drill a hole for a screw.


0401161417a.jpg


Finally, there's another option that can be used in place of both the PVC cap and the plunger rod spacer: cut a 1" CPVC coupling to a length of 2", and put another 1" x 1/2" CPVC bushing on one side. Then hammer it into the back of the plunger tube, and secure with screws. I recommend this option for those interested in making this blaster pump action.


Don't forget to wrap the 1" PVC bushing in a little tape, throw it in the front of the plunger tube, and drill screw holes. Like you would any other homemade of this size plunger tube.


Part III: Handle and Trigger Attachment


This part is lacking in pictures because there's already a writeup for this part. However, there is one change you will need to make: cut the top of the aluminum tubing at an angle. We're putting the ramp on the catch instead of the plunger rod, something that's not possible with more traditional SNAP setups like clothespin triggers. In the end this will save plunger weight.


Note that there's only a 1/2" gap between the face of the CPVC bushing and the plunger head. As such, you'll need to use a spacer to adjust plunger position until you reach full compression directly over the catch. No need to mess up the plunger seal by pulling it past sliced up aluminum tubing.


0401161418.jpg


Finished Product


Here's the end result! As you can see, my prototype is simply a pullback model. Following the above instructions, you should have plenty of room to add pump action priming. You can also throw a few lengths of CPVC on the back to make a proper stock.


0328161301.jpg


With a hopper and 1.5" glue dome stefans (from my Canada trip supplies), all of my shots are hitting 180 to 190 fps out of the barrel. I'll bring this to a war and see how it holds up under abuse! I'll also have to fiddle with barrel length and material to see how fast I can get darts to go using this spring.


Homemade Crazy, Complex, and Pointless Designs

$
0
0

I would like to start a thread on wacky and complex homemade nerf gun designs. I have some that may work or would just be pointless, but here are mine anyway. 
 
1. Fully Auto LOUD Pulse jet nerf blaster
this one is a bit ridiculous, where you build a valveless pulse jet and stick the feeder onto the exhaust, and some insulation to prevent your skin to be burned, but imagine having a fully auto nerf gun that uses only some fuel and physics (with extremley loud noises)
 
2. Fully auto brushless motor nerf blaster
now, nerf has made guns like this, but semi auto. I was thinking getting two brushless motors (outrunners for less noise and higher rpms, inrunners for more torque), attach some flywheels, and a spring loaded dart feeder. This will be noisy (not as noisy as the pulse jet idea) but expensive and might not perform well, but will definitely be fun.
 
3. musket style nerf gun (using some alternative to gunpowder)
this will be dangerous, potentially slightly illegal if using gunpowder, slow reload times, pointless, fun, and a slight chance of malfunction resulting in an explosion blowing off big chunks of your skin. This thing is simple. Single shot. This thing is practically a musket, except built out of PVC and fires foam darts. 
 
Post your inventive, pointless, dangerous, illegal, expensive, crazy, explosive, and complex designs here. Lets see if anyone can get a design to actually work!

USER WAS WARNED FOR THIS POST

http://nerfhaven.com/forums/topic/26832-how-to-post-an-ideaconcept-thread/

RSCB clip + Bullpup + Nerf blaster shell?

$
0
0
Hey all. So I'm new to modding and homemades but I'm super excited I found out about it. I have been searching around quite a bit and have not been able to find an answer to my questions. Basically I'm also very much into the aesthetics of modding too and have been wondering if anyone has ever tried to put their homemade blaster into a nerf shell?

From what I can tell the Bullpup design looks like it would fit the best. I was thinking either an Alpha Trooper or Deploy shell. Maybe a Recon? My other thing was that I'd rather not have a hopper sticking out so I was wondering about the compatibility of the RSCB clip with the Bullpup design?

On a side note, is a bolt slide like the Snap Clip Carbine compatible with the Bullpup? Are there other designs out there that might work better? Thank you for any info or pointers you can give me.

Musket Homebuild.

$
0
0

Hi.
I've been lurking here a while, and first off I'd like to thank the long time posters here, who's posts have helped me design this build. Especially the Rainbow guys for their remarkable catch mechanism.

I'd like to share a slightly different design, which is a musket style homemade designed for use in fairly authentic Medieval LARP games, rather than NERF wars and is based around the NERF Rival ammo.

The design is based around the need to use a ramrod, which is passed down the barrel, and then used to push down and prime the piston, which uses a slightly modified rainbow style catch at the rear of the barrel. The round is then dropped down the barrel, and pushed home with the ramrod. Finally a small amount of talcum powder is poured down the barrel, and a toy cap is fitted just behind the air cylinder.

When the gun is fired, the catch in the rod leaves the rainbow catch, and is caught at the end of the piston travel on a ring, this then activates the cap (making the musket go Bang!) the ball is fired along with the talc (making a plume of smoke) 

Its neither quick to load, or very long ranged, but this is what we were aiming for, as we want them to simulate the loading and effective range of a real 15th Century Arquebus/Musket.


Anyway, if people are interested, I can post some pictures of the internals later, and perhaps a video of it working.
13151610_10153970264005041_996548031108662348_n.jpg

13124859_10153970264010041_7585388487021208168_n.jpg

Trigger mechanism
13001328_10153944539475041_872241717873425710_n.jpg

The bit what goes bang, also showing machined barrel connector
12957701_10153911449950041_3454661782550796522_o.jpg

Some of the internals on display
12909469_10153904083730041_1495342821967554247_o.jpg

Thanks 
Justin.  
 

Cheap clear pvc

EB-1 minerva

$
0
0
Recently my counselor have me an R.C car and as I cannot afford to buy a nerf gun I would like to ask does anyone have ideas on a homemade flywheel cage. All I have is one 3 square inch piece of wood, 1 ft piece of pvc, a little bit of wire, a little bit of caulk and finally a few screws from old toys. Any help would be welcome. I already have flywheels set up on a piece of wood. UPDATE: So far I have added a barrel I just need to make it permant. Also I have to find a switch to wire it to.IMG_20160511_224251.jpg

Attached Thumbnails

  • 1462730780305.jpg
  • 1462730780305.jpg
  • 1462730780305.jpg
Viewing all 167 articles
Browse latest View live